TwistedWave
Reference Manual
1 Introduction
The TwistedWave reference manual is available both in a browsable
format, from the Help menu, and as a printable PDF
here.
What makes TwistedWave unique is its ability to deal with very large
files. You don’t have to wait until TwistedWave has finished loading a
file or applying an effect before you can start playing the result, or
applying another effect. You can read more about this in
section 2.3.
2 Getting running
The first thing you will do with TwistedWave will be to load an
existing audio file, or create an empty document. These tasks are
described in the two following sections.
2.1 Creating a new document
Create a new document by selecting File / New from the main
menu, and you will be asked for the bit depth, sample rate and number
of channels for the new document.
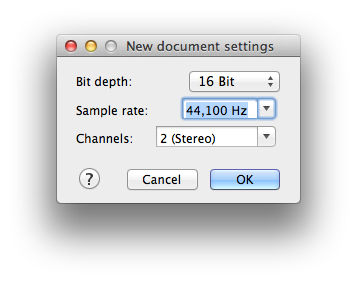
New document settings
The bit depth indicates the resolution at which the file will be
saved. With a higher bit depth, the sound quality will be better, but
the files will be larger. For good results, a value of at least 16
bits is recommended. Note that you can still change your mind, and
select a different bit depth when you save the file. If you save in a
compressed file format, such as aac or mp3, the bit depth will not
have any influence on the resulting file.
For the sample rate, however, it is important to select the correct
value from the beginning. It is possible to change the sampling rate
afterward, but the conversion is never perfect, and will result in a
slight reduction of the audio quality.
The third parameter is the number of channels. Select 1 for mono
files, 2 for stereo files, or any other number you may need.
2.2 Loading a file
More commonly, instead of starting with an empty document, you will
want to open an already existing file, and start working on it.
TwistedWave can handle many different file formats, and opening an
audio file works similarly to any other application, by selecting
File / Open... in the main menu.
TwistedWave also supports many movie file formats, and selecting one
will extract its sound track.
2.3 Large files
When you open a very large file in TwistedWave, it can take a while
for it to load completely. However, you can still immediately start
playing the file, adding effects, copying and pasting parts of it or
do whatever while the file is still being loaded!
It is only when you want to save the resulting file that you will have
to wait for all the pending tasks to be completed.
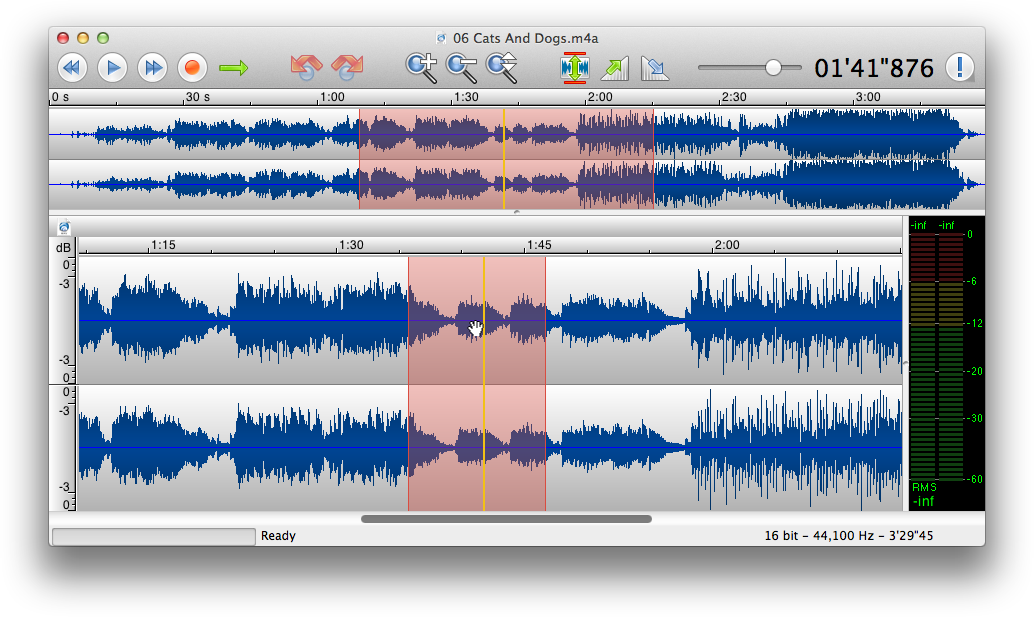
When a task has not finished processing, the part of the waveform that
is not up to date appears in a lighter color, and a progress bar at
the bottom of the window indicates the effect being applied, and the
amount done.
3 Manipulating the Waveform
As it is important to be able to quickly navigate in the sound file to
find the portions you want to listen to, or edit, TwistedWave offers a
number of ways to manipulate the waveform. Both zooming and panning
are fast and easy. Here are the different ways to perform these.
3.1 Zooming
3.1.1 From the toolbar
This is the simplest and most obvious way to zoom. Two buttons in the
toolbar allow you to easily zoom the waveform in and out.
3.1.2 With the scroll wheel
One easy way to zoom in the waveform is to use the mouse wheel. You
can zoom in and out by scrolling up or down.
By default, when zooming in and out, TwistedWave makes sure the cursor
remains in the center of the window. An option in the preferences
window (section 18.2.1) can make this
zoom be centered on the mouse pointer instead.
When this option is enabled, you can move the mouse pointer left or
right to adjust the point where you want to go as you are zooming in.
3.1.3 By dragging
Another easy and very fast way to zoom in the waveform is to press the
command key, and drag the mouse vertically. Move the mouse down do
zoom in, and up to zoom out. You can also move the mouse horizontally
to indicate where you want to zoom in.
This is a very powerful way to navigate in the waveform, because it
allows you to zoom and scroll at the same time. In a single drag, you
can zoom out, move the mouse over another location in the file, and
zoom back in.
3.2 Vertical Zoom
When the sound file you are working on is very quiet, and the waveform
does not show enough detail, you can zoom vertically to work more
comfortably. TwistedWave offers three ways to do this:
- With the Vertical Zoom toolbar icon. By clicking and
dragging on this icon, you can adjust the vertical zoom. A single
click will restore the zoom to its original value.
- By click and dragging on the vertical ruler at the left of the
waveform. This works the same as the toolbar icon. A double click
will restore the zoom to its original value.
- By using the scroll wheel with the command modifier key.
3.3 Scrolling
3.3.1 With the scroll wheel
If you have a mighty mouse, or another kind of mouse that offers a
horizontal scrolling mechanism, you can use it to scroll the waveform
in TwistedWave.
With a regular scroll wheel, you can also scroll horizontally by
pressing the shift modifier key.
3.3.2 By dragging
Another way to scroll the waveform is to drag it with the mouse while
pressing the control key.
Additionally, when you are selecting, TwistedWave will automatically
scroll the waveform when the mouse reaches the edges of the document
window.
3.4 The temporary zoom
3.4.1 Zooming out
As the pattern described above to move in the waveform (zoom out,
change position, zoom in) turns out to be quite useful, there is a
keyboard shortcut just for it. Press Shift-Z, and the wave will zoom
out. When you release the Z key, it zooms back in at the same level
you were before. When you keep the Z pressed, a window appears,
showing you where you will be when you zoom back in. By moving the
mouse horizontally, you can move the window to the location you want
to be.
The zoom window
3.4.2 Zooming in
By pressing the Z key without the shift, you can perform the opposite
operation. When you press it, TwistedWave will zoom in, and when you
release it, it returns to the original position. This can be useful if
you want to see more closely a small detail, without loosing your
current position. What makes this feature very interesting is that
when you are zoomed in, you can still manipulate the wave with the
mouse. If you want to select an area with great precision you can do
the following:
- Press Z to zoom where you want to start the selection
- Click to start selecting
- Without releasing the mouse, release Z to zoom back out
- Press Z again at the location where you want to end the selection
- Release the mouse to end the selection
- Release Z to zoom back out
Note also that when you are zoomed in, you can continue zooming or
panning with the scroll wheel, the scrollbar, or by manipulating the
red window in the overview, control dragging or whatever. When you
release the Z, the view will always revert to the position you were
before you started zooming. This can be useful if you want to see or
select something at another location with the ability to return back
where you were just by releasing the Z key.
3.5 Using the overview
The overview is the area above the main waveform display that shows
the whole file, with a red window indicating the portion visible in
the main display. This red window can also be manipulated in order to
change the visible portion of the sound file. You can drag it to
another position, or reshape it by dragging one of its edges in order
to see a smaller or larger area.
If you press the option key while dragging the window, you will be
able to make it shrink or grow, effectively zooming in or out of the
waveform.
4 The selection
By default, all the effects available will be applied to the whole
sound file. Often, you want an effect to be applied to a small portion
of it. You can do this by selecting the area you want the effect to
work on before applying the filter.
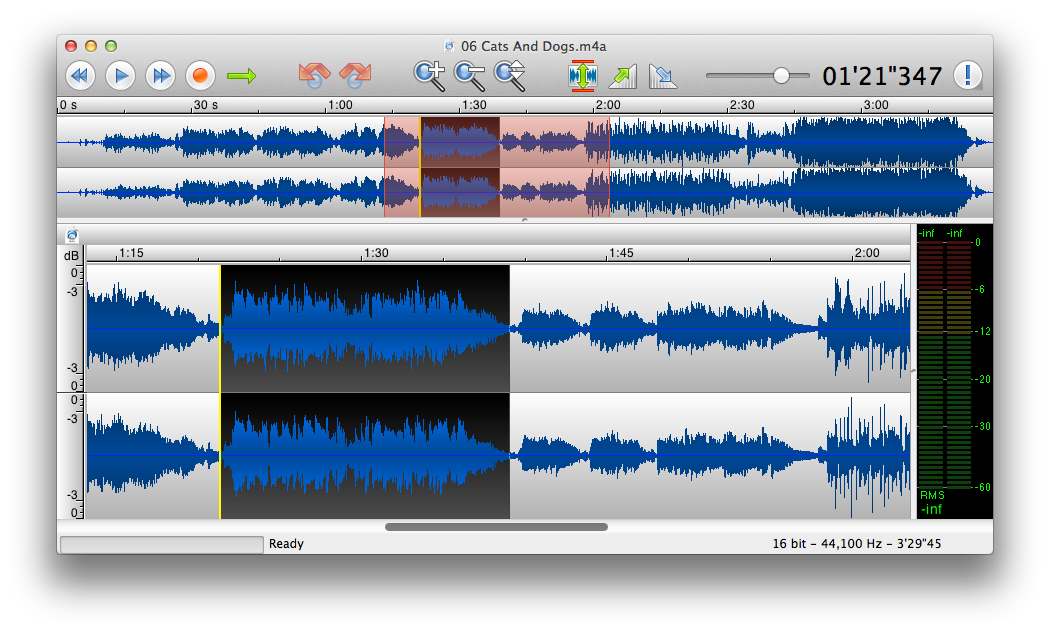
A document with a selected area
4.1 Selecting
In order to select a part of the sound file, just click and drag the
mouse over the area you want to select. In order to get more precision
on the area you are selecting you can temporarily zoom at the places
where you want to start and stop selecting. This process is described
in more detail in section 3.4.
It is possible to adjust the current selection by dragging one of its
edges. This is done by pressing shift when clicking on the waveform.
4.2 Selecting whole channels
It is often necessary to select a whole channel. TwistedWave provides
a convenient way to do this by double-clicking on a channel. All the
data on that channel will be selected from the first to the last
frame. After having double clicked, you can keep the mouse button
down, and drag the mouse pointer over adjacent channels to select
them as well.
By using the option or shift-option key combinations while double
clicking, you can add or remove whole channels from the current
selection.
By triple clicking, you can also select all the channels at once. This
is equivalent to using the Select / All menu item.
4.3 Selection editor
A powerful way to edit the selection is with the selection editor. It
can be opened from the menu Select / Edit Selection…, or
simply by clicking on the selection length in the toolbar
(The selection length is not present in the default toolbar.
You can add it by right-clicking on the toolbar, and selecting
Customize Toolbar….).
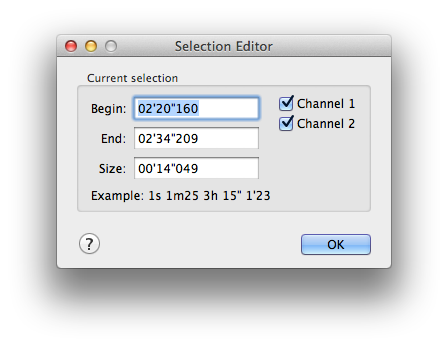
Selection editor
The selection editor allows you to enter numerical values for the
begin, end and size of the selection. When you enter a time in any of
these fields, TwistedWave understands many formats. Simply entering a
numerical value such as 5 corresponds to a number of seconds. You can
also enter 1m25 to indicate one minute and 25 seconds. 3h means 3
hours, 15" is 15 seconds, and 1’23 is one minute and 23 seconds.
On the right hand side of the selection editor, a number of
check-boxes are used to indicate which channels have to be selected.
This can be used to select only the left or right channel in a stereo
file, for instance.
4.4 Cursor editor
Exactly as you can enter the numerical values for the selection, the
cursor editor allows you to enter the time you want to move the cursor
to.
The cursor editor is opened from the menu Select / Edit
Cursor…, or by clicking on the cursor position in the toolbar.
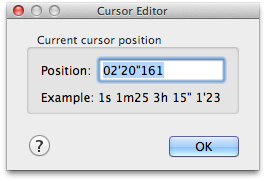
Cursor editor
4.5 Advanced selection
Usually, a selection is just an area contained between two samples.
With TwistedWave, you can have more complex selections that are
composed of several disjoint areas. Such selections can be useful when
you want to apply an effect at different places in the file. Instead
of selecting an area, applying the effect, selecting another area, and
reapplying the effect, you can select all the areas at once, and then
preview the effect on them all, and apply it.
A complex selection
Two key combinations allow you to create complex selections. The first
is by using the alt/option key. When it is pressed, the selections you
make by dragging the mouse are added to the current selection. You can
also remove an area from the selection by using both the shift and alt
keys. As with simple selections, it is still possible to adjust the
edges of complex selections with the shift key.
4.6 Auto extend to crossing
When the Auto Extend to Crossing option from the Select
menu is enabled, the selection is automatically extended by a few
samples to the next zero crossings of the wave at its edges. This is
done in order to avoid discontinuities when the sample is cut and
pasted somewhere else. A discontinuity in the sound wave would result
in a click when played, and should be avoided. When you move the
insertion cursor, it is also automatically moved next to the closest
zero crossing. That way, when you paste something at that position,
this will not introduce a discontinuity.
The selection was automatically adjusted
to start and end at a position where the wave crosses the zero
axis.
It is important to note that if TwistedWave has not finished loading
the file you are working on, or if it is currently applying an effect,
the Auto Extend to Crossing function will not work. The reason
is that because in such a case, TwistedWave cannot accurately
determine the position of the zero crossings. It is therefore not
possible to adjust the selection accordingly.
4.7 Detecting silences
Imagine you have recorded a long file, and you would like to cut the
silences, make them shorter, or split the different parts separated by
silences. This can be a very time consuming task, and should certainly
be automated.
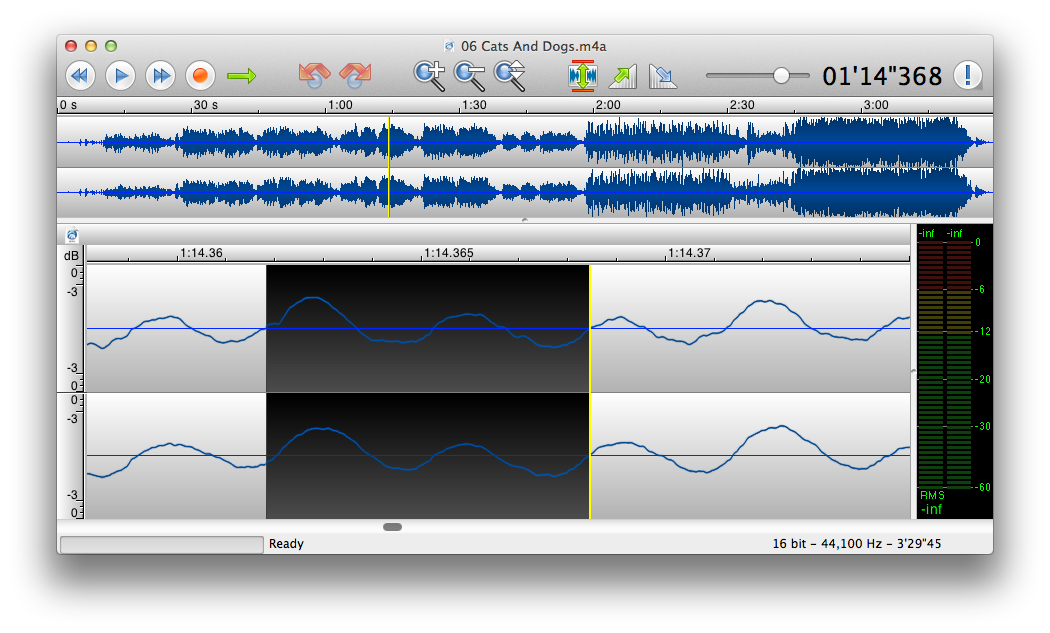
From the main menu, click Select / Detect Silences..., and a
silence detector will come to the rescue.
The silence detector
When the silence detector is open, it will automatically analyze the
audio file, and detect the silences. In order to preview the silences
detected, they will automatically be selected.
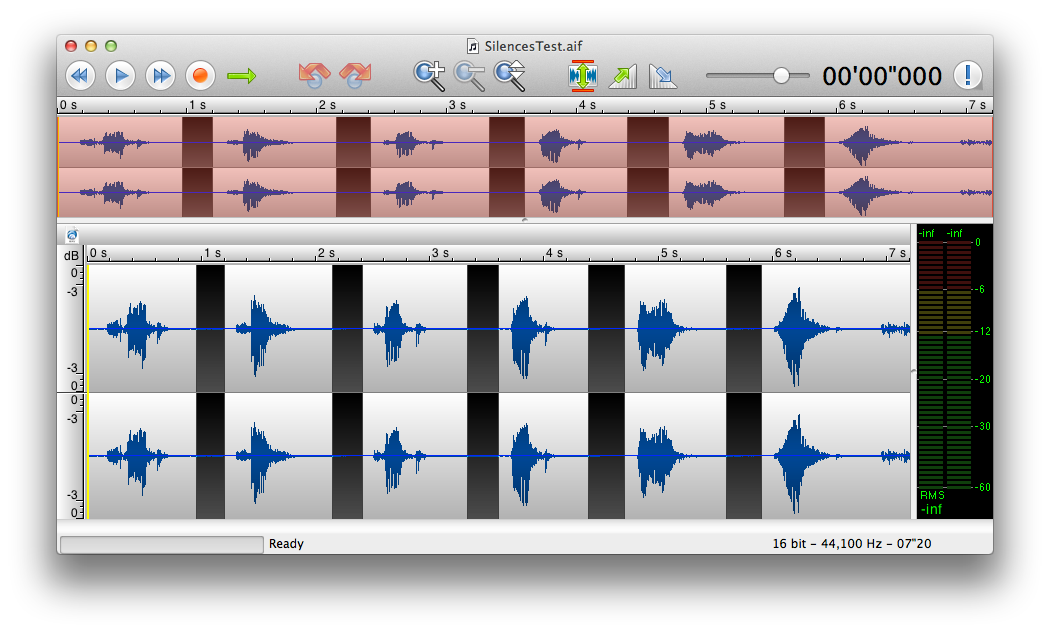
Previewing the silences
Alternatively, you can choose to select the sounds instead of the
silences. That way, you can start playing the audio, and will hear all
the regions that do not contain silences.
When the silences have correctly been analyzed and detected, you can
perform on them any of the actions available from the pop-up button:
- Select Silences. This option will select the parts of the
audio containing silence.
- Select Sounds. This is the opposite of the previous
option, and only the areas not containing silence will be selected.
- Place Markers. Markers will be automatically placed at
the beginning and end of each detected silence.
- Delete Silences. All the silences will be deleted.
- Delete Silences and Mark. All the silences will be
deleted, and some markers will be placed where the cuts were made.
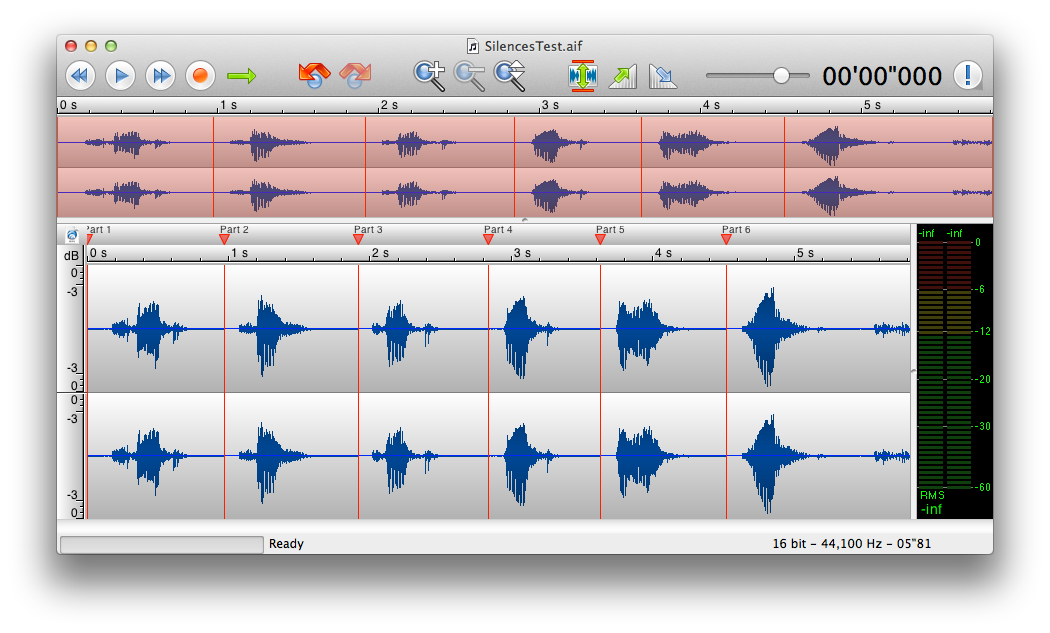
The silences were cut, and markers were added
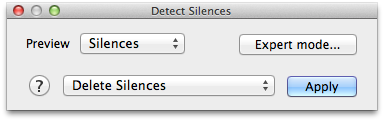
4.7.1 Expert silence detector
If the simple silence detector fails to detect the silences contained
in the audio file, you can switch to the "Expert mode" where a number
of parameters allow you to fine-tune the silence detection.
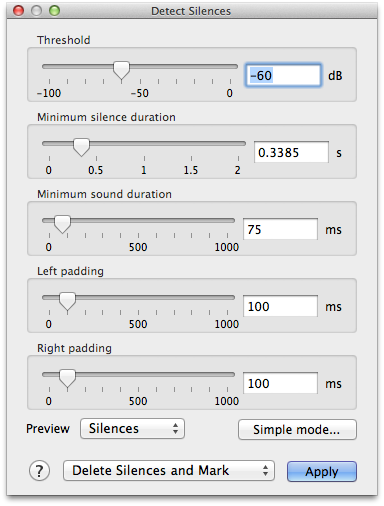
The expert silence detector, with extra
parameters
- Threshold. This parameter specifies the sound level in dB
below which a sound is considered as silence. Note that when you
open the silence detector, the sound file is analyzed, and this
parameter is automatically set to a value that should be fine. You
should only have to change this parameter in some cases where the
distinction between sound and silence is less obvious.
- Minimum silence duration. This parameter specifies the
minimum duration below which a silence is not considered. This can
be useful when detecting silences from a file containing spoken
text, and a small pause between two words should not be considered
as silence.
- Minimum sound duration. This parameter specifies the
minimum duration below which a sound is not considered as such, and
will be treated as a silence. When a short noise is present during a
silence, it can be desirable to still consider the silence as a
whole, and ignore the sounds up to a given length.
- Left and right padding. When you want to cut the silences
from a sound file, it may be necessary to keep around a fraction of
a second of audio before and after each sound. If the sound fades
out at the end, for instance, it may be necessary to keep it a bit
longer even after it drops below the silence threshold.
4.7.2 Splitting a file
A common use for silence detection is splitting an audio file
containing several sounds into several audio files. In order to do
this, select the option Delete Silences and Mark when detecting
silences.
You should then rename the markers to give them the names you would
like to give to your files. You can easily do that with the markers
window (see section 11.3).
And you can then export all the parts separated by markers from the
main menu, Markers / Split by Markers (see
section 11.4).
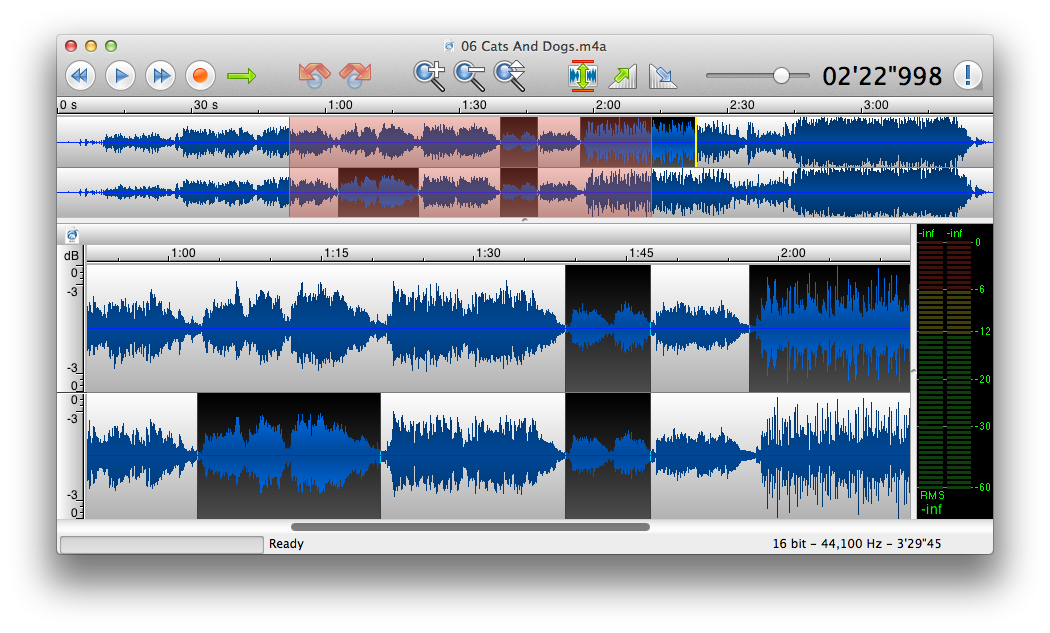
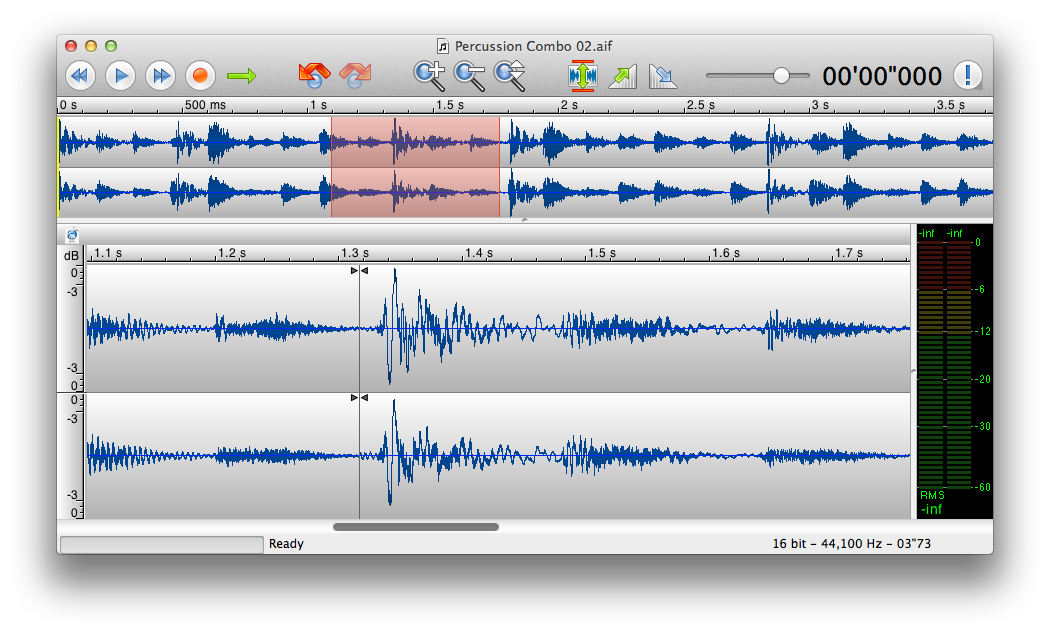
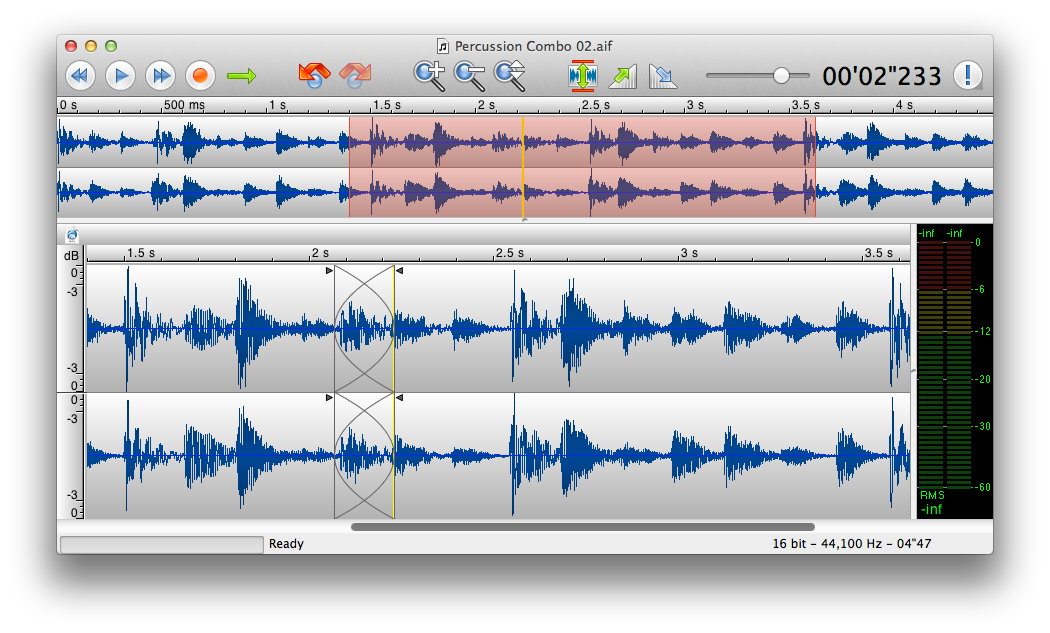
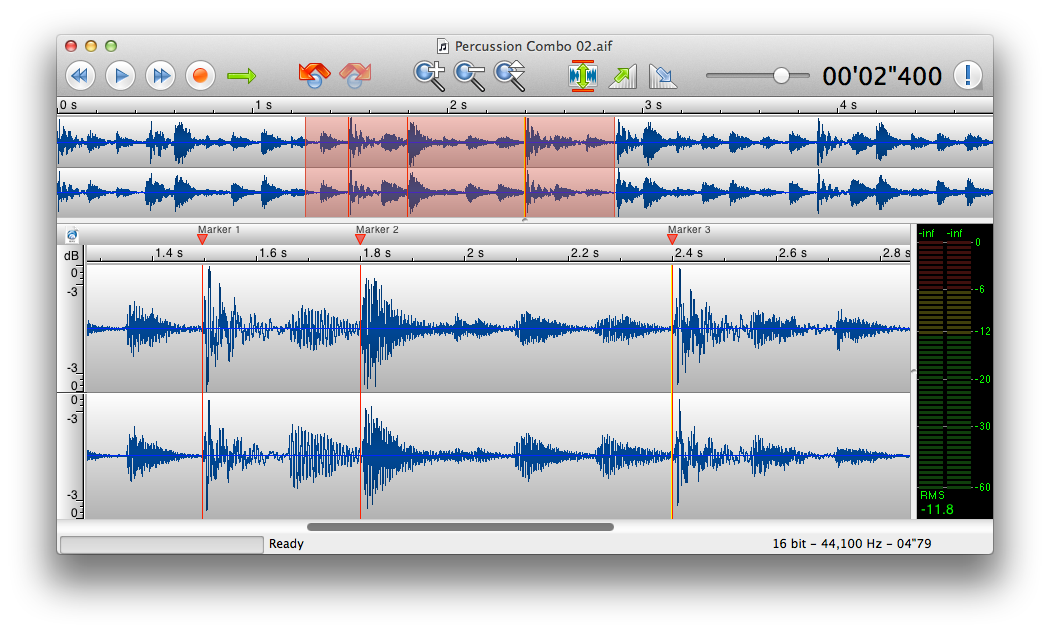
4.8 Detecting transients
One of the most difficult tasks when editing an audio document is to
properly select the area you want to edit. The capture here shows
TwistedWave with a file loaded, containing a percussion loop. The
individual shots are clearly visible, but accurately selecting one of
them requires quite some dexterity.
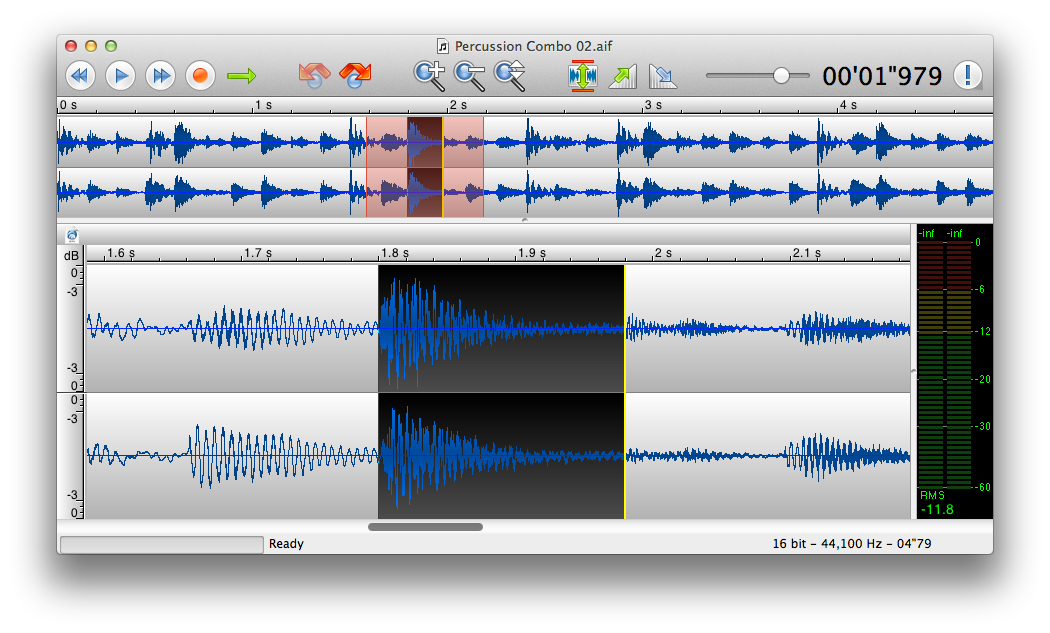
A selected transient
This is where the transient detection in TwistedWave comes handy. This
allows TwistedWave to automatically detect the individual shots in the
file. The operation Select / Move Cursor to Transient,
available with the Tab key by default, moves the cursor to the next
transient in the file, and can be used to easily move to the start of
every individual shots in the file. You can then Shift-Tab to select
the area between the cursor position and the next transient. This is
how we could easily select a single shot, as shown in the capture
here.
The transients in the example shown here are clearly identifiable.
Often, however, there may be a lot of background noise, and the
transients may not be as strong. If TwistedWave fails to detect the
transients, you can adjust the detection threshold from the
preferences window (see section 18.2.4).
4.9 Copy / pasting
Just as in a text editor, once you have selected an area of the sound
file, you can copy the selection, and paste it somewhere else with the
usual ⌘X, ⌘C and ⌘V
shortcuts. In addition to the simple paste that inserts the contents
of the clipboard at the location of the cursor, you can paste over the
existing data. When you Shift-⌘V, the contents
of the clipboard will be mixed in, without altering the length of the
file (Unless you are at the end of the file.).
4.10 Special pasting
In addition to the simple copy and pasting commands described above,
TwistedWave provides a special pasting command whose behavior can be
customized in many ways. This command is available in the menu
Edit / Special Paste, or with ⌘Y by default,
and can be customized with Edit / Special Paste Options….
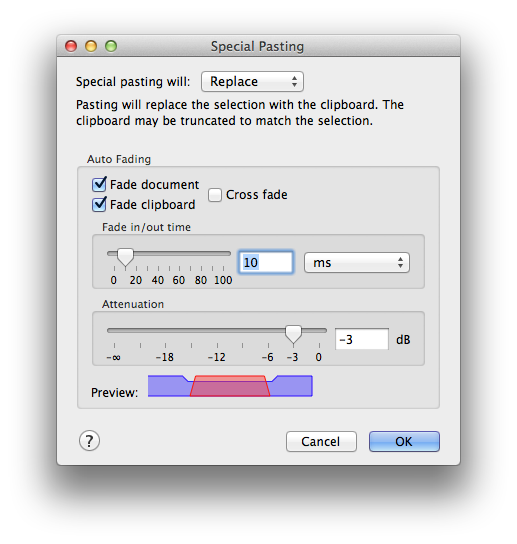
Special pasting options
The pop-up button at the top of the special pasting options selects
the operation that is performed when the Special Pasting
command is invoked.
- Insert will just insert the contents of the clipboard at
the position of the cursor. This is also what does the default
paste, available on ⌘V.
- Mix will not make make the document any longer, but will
mix the clipboard with the contents of the document starting from
the position of the cursor. This behavior is similar to the paste
over, available on Shift-⌘V.
- Replace will replace the selection with the contents of
clipboard. This is similar to Mix, except that only the
selected area will be affected. The clipboard will be truncated to
match the length of the selection. If the selection is longer than
the clipboard, the extra sound in the selected area remains
unaffected.
What makes the special paste special is its ability to automatically
fade in and out the contents of the clipboard, and the document in
which it is pasted.
When copying and pasting, by default, TwistedWave will make sure that
the edges of the clipboard and the document at the insertion point
will fall on a sample value of zero. In most cases, this will prevent
a click when pasting.
However, the transition to the clipboard can still seem too brutal,
and the automatic fading in and out can help a lot making things
smoother. With the options to fade or not the document and the
clipboard, a large number of effects can be achieved. In order to
immediately see how the fades are applied, a preview representing the
document and the content being pasted is shown at the bottom of this
options panel. The blue part represents the document, the red part is
the contents of the clipboard, and the slopes show where the fades
take place.
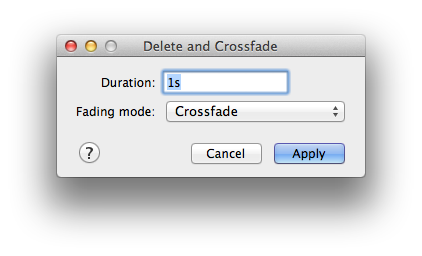
4.11 Crossfading
Deleting a region from the middle of a file will produce a noticeable
cut in the resulting file. This is often not desirable, and a common
solution to such a problem is to apply a crossfade.
In order to apply a crossfade in TwistedWave, simply select the region
you want to delete, and select Edit/Delete and Crossfade...
from the menu, or use the ⌘-Backspace
shortcut. A window will pop-up asking you for the duration of the
crossfade, and will then proceed to mix the audio before and after the
region deleted in order to make the transition smoother.
In addition to the crossfade duration, a pop-up button allows you to
use a fade out followed by a fade in instead of the crossfade.
A third option, Crossfade Centered, differs from the
Crossfade by the way TwistedWave applies the crossfade.
With the first Crossfade option, the selected area is
completely removed, and a piece of sound corresponding to the
crossfade duration is taken before the selection, another piece is
taken after the selection, and these two are then mixed together to
apply the crossfade.
With the Crossfade Centered option, the two pieces of sound are
not entirely outside the selection, but centered on the beginning and
end of the selection. The benefit is that if you select 10 seconds of
sound, for instance, and apply such a crossfade, the total length of
the file will be reduced by 10 seconds, and the reduction does not
depend on the duration of the fade. This can be very important when
editing music, for instance. If you select an area between two beats,
you can apply a crossfade without breaking the rhythm.
After a crossfade is applied, you can still manipulate it, change its
duration, in and out points. See section 5.2.
Applying a crossfade
4.12 The clip list
When working an a long sound file, it is often necessary to take a few
bits out of it, and use them later on to build a new document. This
can be done by copying each part of the file you are interested in,
and pasting it in a new document, but this can be tedious, and you
will end with many document windows obscuring your screen.
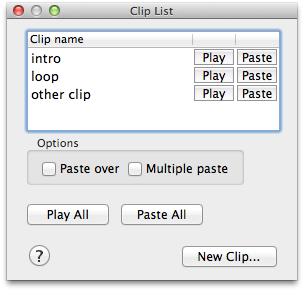
The clip list
As a solution to this problem, TwistedWave offers a clip list. You
open it from the menu View / Show Clip List . Now, when you zip through the audio and have selected an
interesting bit, instead of copying it to the clipboard, create a new
clip from it. Simply press the New Clip… button,
use the corresponding menu item, or press its key
shortcut, simply N. You are then asked to enter a name for the new
clip. Once you have filled the clip list, you can play, paste or
delete them from the list with the corresponding buttons that appear
in front of their names.
Two options can affect the way clips are pasted:
- When the Paste over option is checked, the clip is not
inserted in the audio file, but mixed with the already existing
data, without altering the length of the file.
- When the Multiple paste option is checked, when you press
the paste button, you will be asked how many times the clip should
be pasted. This can be useful when you want to paste a clip many
times without having to repeat clicking on the paste button.
5 Editing cuts and crossfades
In order to cut or to apply a crossfade to a part of the sound file,
you first have to carefully adjust the selection, and then cut or
crossfade (see section 4.11 for applying crossfades). If
the result doesn’t sound good, you can undo, tweak the selection a
bit, and try again.
TwistedWave offers a better alternative. You can manipulate the cut or
crossfades after it has been applied, and preview it without having to
undo or redo anything.
Note that cuts and crossfades can only be edited when they are the
last operation performed on a sound file. If you perform another
operation, the changes you would have made to the cut or crossfade are
committed, and you cannot edit them without having to undo and redo
them, in the old way.
5.1 Editing cuts
The capture below shows the waveform just after having deleted a part
of the audio. A gray vertical bar shows where the cut has taken place,
and two arrows are visible on each side of the cut. (Also note that a
marker was automatically added by TwistedWave. See
section 11.5 to know how to do this.)
These two arrows are in fact two handles, and you can grab and drag
them to move the audio in or out of the cut.
Editing a cut
5.2 Editing crossfades
The capture below shows the waveform just after having applied a
crossfade. Just as when editing cuts, two arrows appear, which you can
grab and drag to adjust the position where the crossfade starts and
ends.
You can also grab one of the two vertical bars, and drag it to adjust
the duration of the crossfade. Note that depending on the kind of
crossfade you have selected, adjusting the crossfade duration can
affect the total length of the file or not. See
section 4.11 for more information.
Editing a crossfade
6 Playing
When editing an audio file, in order to find out what parts of the
file to select, cut, or apply effects to, it is important to know to
what parts of the waveform correspond what sounds. When you play the
file once, you get a rough idea of what sound corresponds to a given
shape in the waveform.
While TwistedWave is playing, it is possible to click in the waveform
to move the playhead, or select a specific area you are interested in.
You may find that simply playing a selection is no enough to make
accurate selections, and this is where scrubbing comes to the rescue.
6.1 Scrubbing
Scrubbing gives you more control on the position of the playhead, and
allows you to listen to very specific parts of the audio and get a
clear idea of where specific sounds are located in the waveform.
Scrubbing is performed by clicking and dragging the mouse in the
rulers, above the main wave and the overview windows. Depending on
your needs, three scrubbing modes can be selected from the preferences
window.
- Repeat. In this mode, a small area around the mouse
pointer is repeated continuously. The audio is played at the nominal
speed, and sounds natural.
- Velocity. This mode allows you to control the speed at
which the playhead moves in the waveform. This mode allows you to
play the audio slower or faster than the nominal speed, but this
also affects the pitch of the sound. This mode can be very effective
when detecting clicks in the audio.
- Position. This mode is similar to the velocity mode,
except that you have a direct control on the playhead position
rather than its velocity. This makes it easier to play a very
specific area.
7 Applying effects
This section describes a few effects provided by TwistedWave.
The most interesting effects, however, come from plugins in the
Audio Unit or VST format. Using plugins in TwistedWave is described
in detail in section 8.
7.1 Amplify
The simplest effect you may want to apply on a signal is to adjust its
volume. The amplify effect allows you to choose a gain in decibel to
apply to the selected area of the sound file.
7.2 Normalize
When you record from a microphone, or import a sound sample in another
way, it can happen that the sound level was not properly adjusted, and
appears very low when played, compared to other sound files. You can
use the amplify effect to increase the volume by the desired amount.
The normalize effect, however, does this automatically. It scans
through the entire region, and finds the area where the sound level is
the highest. It can then automatically determine by what amount it is
possible to amplify without introducing any clipping.
The "Normalize to" pop-up button indicates what level is being
normalized. It can be set to one of:
- Peak Value. With this setting, TwistedWave look at the
sample with the highest peak value, and the sound volume is then
adjusted to have the level of this sample match the value specified
in the normalization level. With this setting, and a normalization
level of 0 dB, for instance, TwistedWave will amplify the sound as
much as it is possible without generating any clipping.
- True Peak Value. This setting is similar to the above,
with the difference that the signal is oversampled in order to
detect peaks that happen between two samples. This can be useful to
make sure the level does not exceed a certain value after the audio
has been converted from digital to analog.
- RMS Value. This setting is different from the two
previous in that TwistedWave does not look for the loudest part in
the audio, but computes the average energy content of the whole
audio.
- LUFS (BS-1770, R128). This setting is similar
to the previous one. The only difference is in the way the average
energy content is measured. TwistedWave uses the recommendation
ITU-R BS.1770 to compute a value more closely related to the
perceived loudness, by attenuating the low and high frequencies
before measuring the average energy content.
The next two settings, the maximum gain and maximum
attenuation, indicate the maximum amount by which TwistedWave can
amplify or attenuate the sound volume to match the given normalization
level. If these options are not checked, TwistedWave is allowed to
adjust the gain as much as is necessary.
The last setting, maximum peak value is useful when we are
normalizing to a target RMS or LUFS value. In these cases, especially
if there is a lot of dynamic range in the audio, it is possible for
the normalized sound to exceed the full scale, and clip. When this
option is checked, TwistedWave will make sure the maximum peak value
does not exceed the specified value, even if that means the loudness
does not reach the target value.
7.3 Fade in, fade out
These effects will continually adjust the sound volume of the selected
area. When applying a fade in, the sound volume gradually increases to
its original level. A fade out does the opposite, and decreases the
volume to zero.
To see how you can apply crossfades, see section 4.11.
7.4 Custom fade
The custom fade is more customizable than a simple fade in or fade
out. Instead of gradually fading from 0 to 100%, the attenuation can
be specified at the beginning and the end of the selection.
7.5 Loop crossfade
The "Loop Crossfade" is a special kind of fading where the end of the
sample is crossfaded with the beginning. The resulting sample can be
played seamlessly in loop.
7.6 Manipulating channels
All the channel manipulation functions are grouped in the Edit
menu. A few basic functions allow you to add or remove channels, and
convert the document to mono or stereo.
When working on complex documents with more than two channels, it may
be hard to get anything useful from these basic functions. For all the
complex tasks you will find a tool to reorder the channels in the menu
Edit / Reorder Channels…
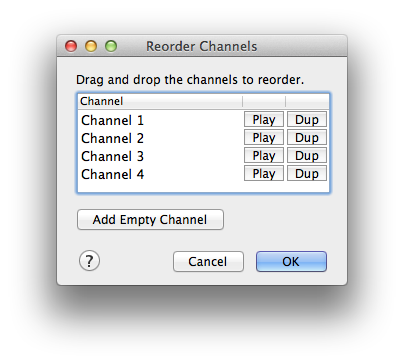
The channel reordering tool
With the channel reordering tool, you can:
- Reorder the channels by drag and dropping them.
- Remove selected channels by pressing the delete key.
- Add channels by duplicating already existing ones.
7.7 Sampling rate conversion
The sampling rate is the frequency at which the sound is sampled. On a
CD, for instance, the sampling rate is 44 100 Hz. It can be necessary
to convert the sampling rate if you have a recording at 48 kHz, and
you want to record it on a CD, for example.
With a lower sampling rate, the sound data will take less space on the
disk, but at the cost of loosing the high frequencies. The highest
frequency that can be represented at a given sampling rate is half the
value of the sampling rate. On a CD, for example, no sound higher than
22 050 Hz can be represented.
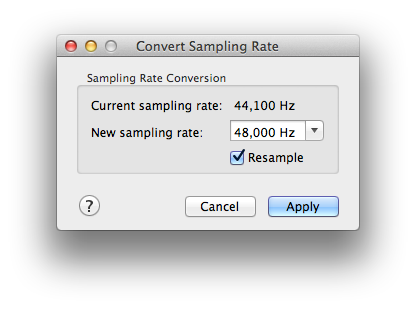
The sampling rate converter
The window that asks you for a new sampling rate offers the option to
resample. When it is checked, as it is by default, the wave will be
resampled so that it does not sound different (Unless you are
converting to a lower sampling rate, in which case you will lose the
higher frequencies.). If you uncheck it, TwistedWave will keep the
samples untouched, and merely tag the audio as having the new sampling
rate. This will result in the sound to be played faster or slower. The
file will also sound higher or lower, just as if you were adjusting
the speed of a turntable. If you want to change the speed of a file
without modifying the pitch, you should use the Change pitch and
speed function, described in the next section.
7.8 Change pitch and speed
This function allows you to change the pitch and speed of a sound
file. It can be used to change the speed without affecting the pitch,
changing the pitch and keeping the original speed, or any combination
of pitch shifting and time stretching.
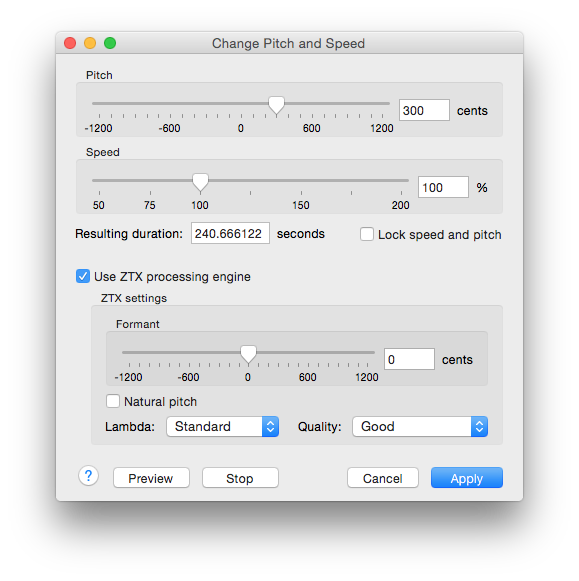
The pitch and speed adjustment interface
By checking the Lock speed and pitch option, you will get the
effect you would have when playing a tape or record at a different
speed, where both the speed and pitch are affected at the same time.
When the Use ZTX processing engine option is
checked, instead of using Apple’s time stretching implementation,
TwistedWave uses the ZTX Time Stretch/Pitch Shift technology licensed
from Zynaptiq GmbH, http://www.zynaptiq.com/ztx/, (c) Zynaptiq GmbH.
ZTX’ pitch shifting is one of the best pitch shifting implementations,
and is an excellent replacement for Apple’s one.
In addition to shifting the pitch of the audio, the ZTX processing
engine can also shift the formants. By shifting them with the opposite
value of the pitch shift, they will be unaffected by the pitch
transformation, and the result will sound more natural.
By checking the Natural pitch option, the formant shift will
automatically be adjusted to avoid them being pitch shifted.
7.8.1 Time/frequency localization and the ‘lambda’ parameter
ZTX uses a novel algorithm that can be scaled to provide good time
domain localization or good frequency localization, or both. High time
localization means that ZTX produces results similar to the time
domain pitch-synchronized overlap-add (PSOLA) methods, high frequency
localization produces results that are closer to what you get from an
improved phase vocoder.
This ability is controlled by the “lambda” parameter. As a rule of
thumb, a low Lambda value provides good time localization (good for
voice and single instrument recordings), while a high lambda value is
good for entire mixes. High lambda values take slightly more time to
process but are not considerably slower.
The following lambda settings are available:
- Preview.
This automatically selects the best time/frequency trade-off for
realtime/preview performance. It is the fastest setting but might not
provide the best results in all cases.
- Voice.
Selects full time localization. Good setting for single instruments
and voice.
- Duet.
Time/frequency localization with emphasis on time localization. If a
setting of Voice produces echoes this might be a better choice.
- Standard.
This sets the time/frequency localization halfway between time and
frequency domains. It is the best setting for all general purpose
signals and should be set as default for non-realtime (non-preview)
processing.
- Smooth.
Higher frequency localization and less time localization. Might be a
better choice for classical music than the lower-lambda settings
- Classics.
Highest frequency localization. This might not be an ideal choice if
you’re dealing with signals that have very sharp attack transients but
it might be useful for sensitive material such as classics
- Transcribe.
Special mode for very large stretch ratios (2x to 4x).
7.9 Pitch correction
The pitch correction uses the ZTX Time Stretch/Pitch Shift technology
to automatically adjust the pitch of the selected audio. It works by
detecting the pitch of each note, and adjusting them to the closest
note.
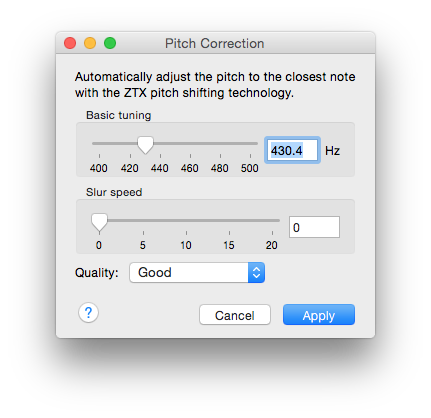
The pitch correction interface
The pitch correction can be altered with the following parameters:
- Basic tuning.
This value defines the reference tuning for the pitch correction.
- Slur speed.
Defines the time it takes for the correction to reach the full
correction amount. Typically, notes are a bit unstable at the
beginning, because the attack phase of a sound has a higher amount
of noise, and because singers gradually adjust their tuning after
the onset of the note. The slur time makes the pitch correction
sound natural because it models this effect. Higher values will
yield a slower adaptation time and it will take longer for the
correction to produce the corrected pitch.However, longer slur times
will also preserve vibrato better.
- Quality.
This setting allows you to choose a compromise between the sound
quality and the processing speed.
7.10 Noise reduction
It is possible to use TwistedWave to remove background noises from a
recording.
In order to do that, TwistedWave first has to learn about the noise
you want to remove. Select a part of your file that contains only the
background noise, and none of the sounds you want to keep, and select
Effects / Learn Noise Profile from the main menu.
Once TwistedWave has learned the noise profile, you can select the
whole file, or just the part you want to remove noises from, and
select Effects / Denoise... from the menu. The Denoise
Amount slider allows you to adjust the amount of noise to be
removed from the recording. You can click the Play button to
preview the effect, and click Apply when you are satisfied with
the result.
I suggest you use the smallest amount of reduction that will remove
the unwanted noises, in order to avoid removing too much of the sound
you want to keep.
8 Audio Unit and VST plugins
Audio Units is Apple’s audio plugin technology. These plugins
produce sound effects that can be applied to the selected parts of
your documents. A few Audio Units are provided by Apple and are
available on every Mac, such as a few filters, equalizer, pitch
shifter, reverb and more. Many Audio Units provided by third parties
are also available. A comprehensive list is available on
macmusic.org.
VST (Virtual Studio Technology) is another plugin
technology, created by Steinberg. Similarly to Audio Units,
VST plugins can provide many effects, and a comprehensive list is
also available on
macmusic.org.
8.1 Using a single Audio Unit or VST plugin
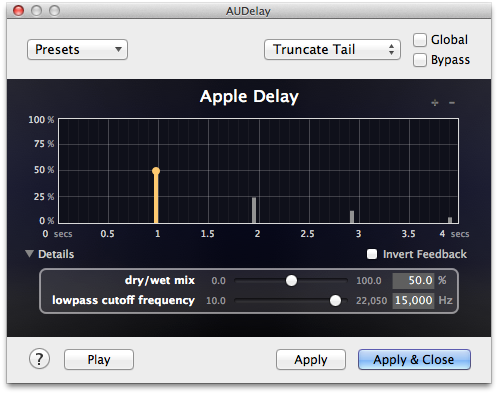
An Audio Unit window
Loading a plugin is as simple as choosing it from the Effects /
Audio Units & VST menu. TwistedWave will open a window
showing the plugin interface.
When you opened an Audio Unit or a VST plugin, it remains
active on the current document. That means that when you start the
playback, the plugin will be applied to the file in real time. You can
even have more than one open at the same time, and they will all
process the sound when the document is being played.
In some cases, you want an Audio Unit or VST plugin to be
applied not just to one document, but to all the documents open in
TwistedWave. This can be done with the Global option. When it
is checked, the plugin window will remain visible, and the effect will
be applied when playing back any document. This can be useful in
particular with visualization plugins. A VU meter, for instance, could
be useful for all the documents you could be working on.
If you want to permanently alter the sound file by processing it with
the the Audio Unit or VST plugin, you can press the
Apply button, and the plugin will process the selected area of
the document, or the whole document if nothing was selected.
Note that when the file is saved, the active plugins will not be
saved, and won’t affect the file being saved. If you want to save the
result of processing the document with a plugin, you should apply it
first.
In the top right hand corner of the plugin window, a pop-up button
offers you to choose what to do with the tail of the effect. The tail
of the effect is the sound produced by the Audio Unit or
the VST plugin after it has finished processing the selection. If you
use a delay to add an echo, for instance, it might take a few seconds
for the echo to repeat until it has completely disappeared. There are
three ways in which TwistedWave can deal with this tail:
- Truncate tail. With this option, the plugin will stop
processing once it has reached the end of the selection, and the
tail will be discarded.
- Insert tail. The tail will be inserted in the document,
at the end of the selection.
- Merge tail. The tail will be mixed with the contents of
the document after the selection. Note that this option will alter a
part of the sound that is not selected by mixing the tail of the
effect to it.
8.2 Saving presets
You can press the Save button at the top of the plugin window
to save the current preset. You will then be asked to name the new
preset. You can access saved presets from the Load Preset
pop-up button.
Presets are saved as files in a folder corresponding to the current
plugin. Selecting Manage Presets…
from the menu will open this folder in the Finder. This allows you to
rename or delete presets. You can also put them in sub-folders, and
they will appear in sub-menus when you open the presets menu.
8.3 Using the effect stack
With the effect stacks, TwistedWave provides a convenient way to group
plugin together. This makes it easy to save their presets as a whole,
reorder the plugins, or apply all of them at once.
Select New Effect Stack… from the
Effects menu, and TwistedWave will open an initially empty window. The
Add Effect menu allows you to choose the Audio Unit or
VST plugins you want to add to the stack. When you have added
a few effects, you can start previewing them by pressing the
Play button, and all the effects in the stack will be applied
in real time on the selected area of the document. That means that you
can change the parameters of all the Audio Unit and VST
plugins before committing the changes to the document.
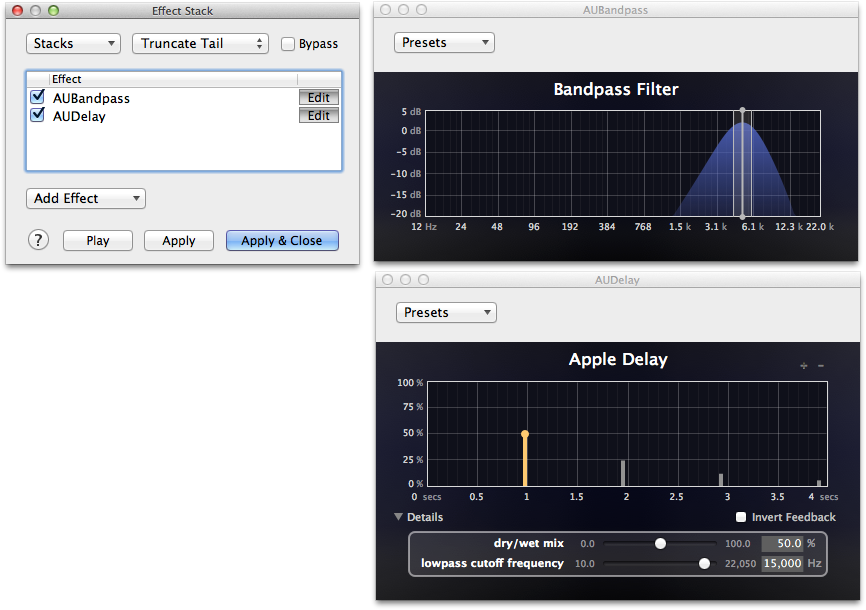
The Effect Stack with two effects being
edited
The effect stack works as a single plugin window (see
section 8.1) in the way that an effect stack window is
always active on the current document. The effects it contains are
always applied when playing back the document.
In the same way that you can save Presets for individual Audio
Unit or VST plugins, you can save a whole effect stack. In
addition to the Load Stack pop-up button,
you can load an effect stack directly from the main Effects
menu. A Load Stack menu appears below the New Effect
Stack… when some saved stacks are available.
9 Generating Sounds
9.1 Signal Generator
The signal generator is a tool that allows you to generate simple
signal patterns. The options allow you to select the shape of the wave
(sine, rectangle, triangle or sawtooth), its frequency and amplitude.
If you have checked the Sweep option, you will have the ability
to generate chirps by selecting an end frequency. The frequency of the
generated signal will change progressively from the original frequency
parameter to the end frequency you have specified.
When the Automatically adjust frequency to avoid clicks option
is enabled, TwistedWave will make sure the end of the generated signal
corresponds exactly with the end of one period. This can be useful to
avoid clicks at the end of the signal. The frequency of the signal, or
the end frequency in the case of a sweep, will be adjusted to make
sure the wave reaches zero at the end of the generated audio.
In addition to periodic signals, the signal generator can produce
white or
pink noise. These are two kinds of
noises where the energy is distributed across all frequencies in the
spectrum.
When you have adjusted the signal parameters, clicking Apply
will add the generated signal to the current document in one of three
ways, as chosen from the Action pop-up button.
- Insert will insert the generated signal at the position
of the cursor.
- Replace Selection will replace the contents of the
selection with the generated signal.
- Mix with Selection will keep the contents of the
selection, and mix it with the generated signal.
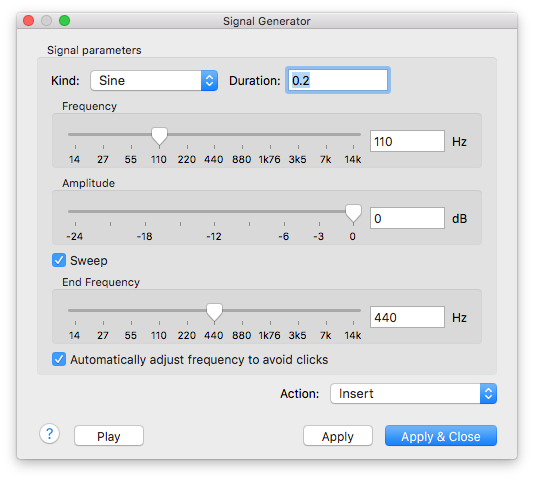
Signal Generator
9.2 Speech Synthesis
The speech synthesis effect uses Apple’s built-in speech synthesis to
convert a text to speech.
Enter some text, and press OK to insert the spoken text in the current
document at the position of the cursor.
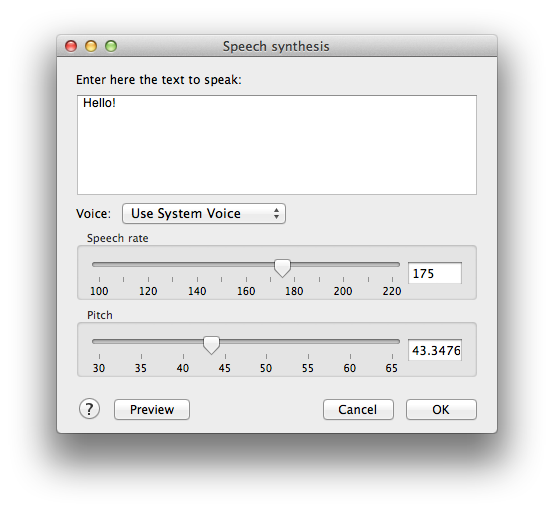
Speech Synthesis
A number of different voices are available to synthesize the speech.
They can also be further refined by adjusting the speech speed and the
pitch of the voice.
It is possible to install more voices from the System Preferences. In
the accessibility preferences, click "Speech", and then in the
"System Voice" pop-up button, select "Customize...".
10 Recording
In addition to being able to import samples in many different formats,
TwistedWave allows you to create new samples by recording from any of
the audio devices connected to your Mac, such as a
microphone.
You can start recording by selecting Audio / Start Recording
from the menu, or by pressing the Record button from the
toolbar. Note that this function is available only when TwistedWave is
ready, and is not currently busy reading a file, applying a filter, or
performing any other background task.
When the recording session has started, the audio is inserted in the
current document at the position of the insertion point, and the level
meters show the peak levels of the audio being recorded. This is
intended to help you adjust the input level to a good value, and
making sure no clipping takes place.
10.1 Punch-in recording
Another recording mode is available by selecting Audio /
Punch-In Recording. When that option is selected, TwistedWave will
play a couple of seconds of audio before the cursor position, and when
it reaches the cursor, it stops playing audio back and switches to
recording. This can be very useful to re-record a section of a longer
recording.
When doing a punch-in recording, by default, the recorded audio
replaces the existing audio. It is possible to change that behavior,
and have the new audio be inserted instead. This can be configured
from the preferences window, in the Recording section of the
Editing tab.
If you are initiating a punch-in recording while the selection is
active, the recorded audio will never be inserted, but will instead
replace the selected region. Once the recorder has reached the end of
the selection, it will automatically stop recording.
This can be useful when you want to re-record a single word or
sentence, for instance, and replace it with a new recording of the
same duration.
10.2 Glitch detection
When TwistedWave is recording, the audio is provided by macOS one
buffer at a time. In some rare cases, when using very small buffers
and / or when your Mac is heavily loaded by other CPU intensive
applications, it is possible that TwistedWave misses a buffer, and a
glitch is introduced in the audio.
TwistedWave has the ability to detect these glitches and will tell you
how many glitches have occurred at the end of the recording session.
In order to help you identify the glitches, TwistedWave will also
automatically place a marker where they happen, unless you are using
TwistedWave Lite where support for markers is not available.
If you are experiencing glitches in your recordings, a good way to
avoid them is to increase the buffer size, in the audio devices
preferences (see section 18.3).
11 Markers
Markers are a kind of index that can be used to identify a specific
place in the audio file. They can be given a name, which makes it
obvious what they point to.
Another use for markers is to indicate the beginning of each track
which might compose a sound file. When preparing a CD, the application
responsible for burning the CD might expect a list of markers to
indicate the beginning of each track.
11.1 Manipulating markers
The capture here shows a document with a few markers. The markers are
represented as a vertical line in the waveform. Additionally, an arrow
and a label are shown in the area above the time ruler. Within this
area, you can:
- Add a marker by clicking anywhere in the ruler.
- Move a marker by dragging it within the ruler.
- Remove a marker by drag and dropping it out of the ruler.
- Manually enter its position and label by double clicking on a marker.
Markers
A convenient way to create markers is to click Markers / Add
Marker from the menu, or press the shortcut key M. This command
will automatically add a marker at the current cursor position.
Because this also works when TwistedWave is playing or recording, you
can play a whole file, and mark places you want to inspect and edit at
a later time.
TwistedWave can also automatically add markers when certain operations
are performed. See section 11.5.
11.2 Importing/exporting markers
When an audio file is burnt to a CD, markers are often used to mark
the beginning of each track. Although TwistedWave can save markers in
WAV or AIFF files, some software prefer having the markers saved in a
separate file. From the Markers menu, the options Import
Markers… and Export Markers… allow you to manage
CUE files containing markers. The CUE files are commonly recognized by
CD burning applications, and contain the necessary information to
split the audio file in several tracks.
11.3 Markers window
From the menu, the option Markers / Markers Window opens a
window showing a list of all the markers present in the current
document.
By double clicking on the items in this list, you can easily rename
the markers, and set their positions to a precise time.
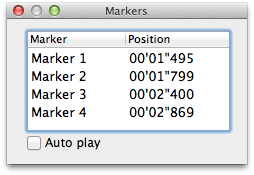
The markers window
11.4 Splitting by markers
Because markers are often used to indicate the beginning of individual
track in an audio file, an area between a pair of markers corresponds
to a track, and in order to work on individual tracks, it can be
useful to split the tracks, and save them in individual files. This
can be done by selecting Markers / Split by Markers from the
menu.
By default, the names of the files generated correspond to the names
of the markers, prepended by the number of the track. You can also
manually edit these names, or uncheck them if you don’t want to save a
specific track.
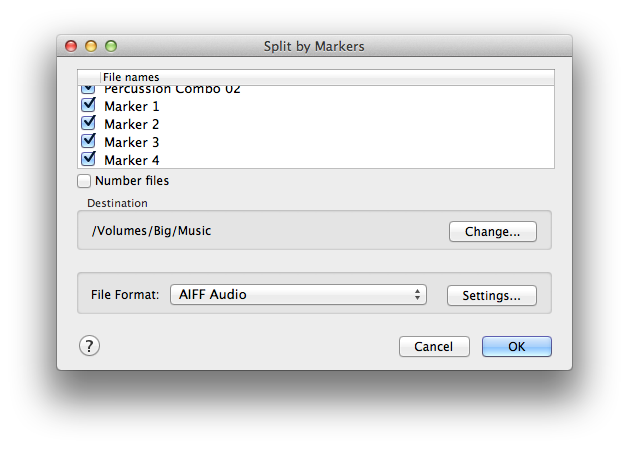
Splitting by markers
11.5 Automatic markers
Some operations, such as cutting, or applying a crossfade can have a
dramatic effect on the sound file. Therefore, it can be important to
always know where such operations were applied. A convenient way to
always remember a place is to insert a marker.
When the option Markers / Auto Mark Cuts is enabled,
TwistedWave will automatically add a marker whenever you cut a part of
the file, or apply a crossfade (Delete or Delete
Crossfade… from the Edit menu).
12 Speech recognition
12.1 Recognizing speech
When working with spoken word, given enough experience, it is possible
to identify sentences and even individual words from the shape of the
waveform, but you have to listen to it in order to know what word
corresponds to each part of the waveform.
By using speech recognition, TwistedWave can automatically show the
content of your audio in plain text, enabling you to see the contents
of your recording without having to play it back.
There are two ways to trigger a speech recognition. You can start it
manually on an existing audio file or recording (or a selected area
thereof) by selecting Speech / Recognize Speech from the menu.
You can also have TwistedWave recognize the speech in real-time while
audio is being recorded by selecting Speech / Record With Speech
Recognition from the menu.
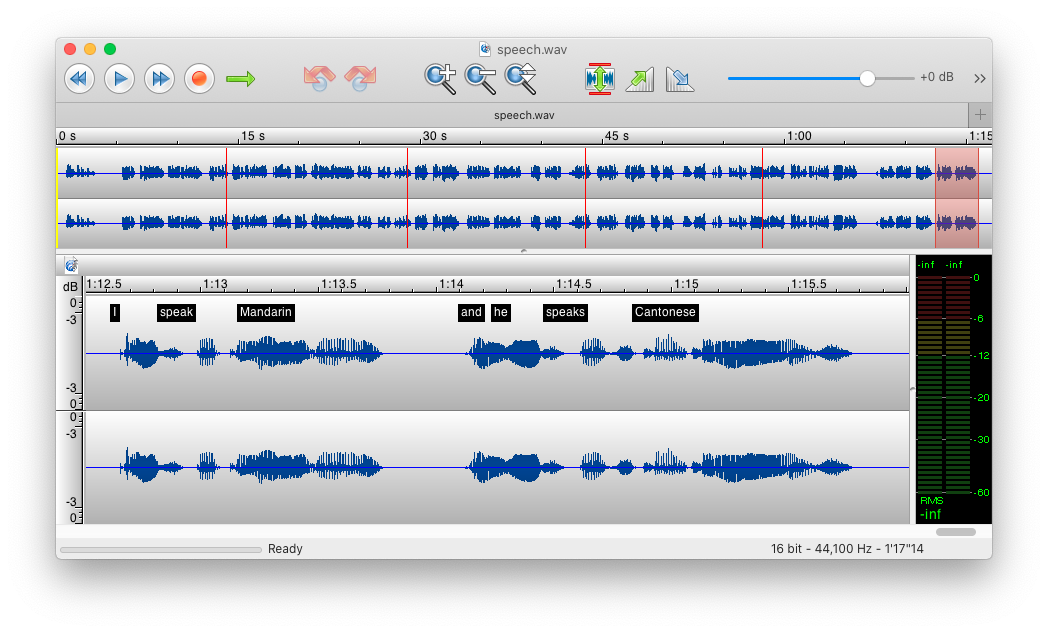
Speech recognized
12.2 Configuring Speech Recognition
Before you can use it, you need to configure the language or model to
use for the speech recognition.
TwistedWave can use one of two speech recognition engines. As
described below, the Whisper based speech recognition is currently
only available for the manual speech recognition. For that reason, it
is possible to select two different models, one for the real-time
speech recognition, and a different one for the manual speech
recognition.
12.2.1 Apple’s Speech Recognition
Apple’s speech recognition, available since macOS 10.15, can be used
to perform the speech recognition of your audio files and recordings
directly on your Mac, without requiring an internet connection, or
sending the audio to Apple’s servers.
Before you can use Apple’s speech recognition, you need to select the
language that has to be recognized, either from the speech tab of
TwistedWave’s preferences, or by selecting Speech / change
Recognition Model... from the main menu.
For a language to be available for selection in TwistedWave, it has to
be configured in macOS’ system preferences by following these steps:
- Open System Preferences.
- Click Accessibility.
- In the sidebar, scroll down and choose Voice Control.
- Tick the Enable Voice Control checkbox.
- You will be prompted by macOS to enter your password.
- macOS may need to do a one-time download. Wait for it.
- You may untick the Enable Voice Control checkbox.
12.2.2 OpenAI’s Whisper Speech Recognition
Since version 29.3, TwistedWave also offers the possibility to use
OpenAI’s Whisper speech recognition engine.
Whisper also runs locally on your Mac. Its main advantage is that
depending on the model you choose, it can be either much faster, or
much more accurate than Apple’s speech recognition.
Instead of a language, in order to use Whisper, you need to select one
of different speech recognition models with different speed / accuracy
trade offs. Some models are English only, and will only recognize
speech in the English language, presumably with better accuracy. The
other models are multilingual, and will automatically recognize the
language in the speech.
The only limitation of Whisper is that it is currently not possible to
use it for real-time speech recognition, and you can only use it
manually on an existing audio file or recording (or a selected area
thereof) by selecting Speech / Recognize Speech from the menu.
12.3 Speech markers
When TwistedWave recognizes speech, it shows the text content of each
word that was recognized in the file. These are stored internally as
markers, so they behave exactly like markers. If you copy and paste
audio around, the speech markers will be copied along with it.
The speech markers are in fact regular markers behind the scenes.
TwistedWave can tell a regular marker from a speech marker by placing
a double quote in front of the marker name. If the word hello
has been recognized, for instance, a marker named "hello will
be stored in the audio file.
Because you may want to keep the speech recognition to continue
working with it at a later time, TwistedWave also saves these markers
along with the audio, exactly as it would save regular markers.
When you send your audio files to someone else, if they don’t open it
with TwistedWave, they may be annoyed by the number of markers placed
by TwistedWave’s speech recognition. For that reason, it is possible
to remove the speech markers by selecting Speech / Clear Speech
Recognition from the menu. Alternatively, you can prevent
TwistedWave from saving the speech markers by disabling the option to
Save Speech Recognition With Files either from the
Speech menu, or from the Speech tab of the preferences
window.
12.4 Synchronizing with a text script
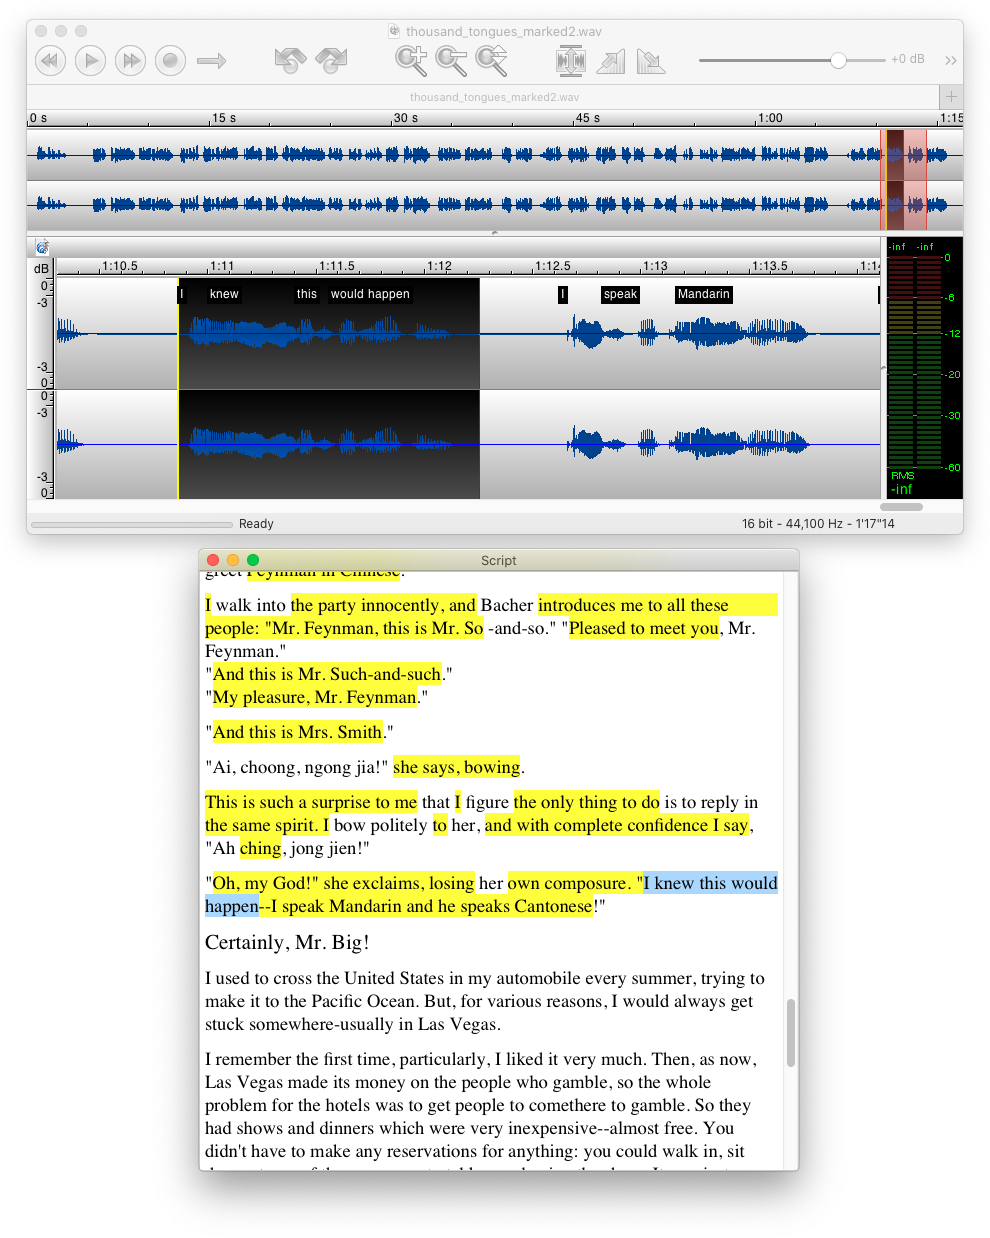
Text Script window synchronized with the waveform
Once the speech in your audio file has been recognized, and the speech
markers are visible in the main waveform, it is possible to
synchronize the audio file with a text script, either in the
.txt, .rtf, .rtfd or .pdf format, then
TwistedWave can open it, and show it along with your audio file.
Select Speech > Load Text Script... from the menu, or simply
drag and drop the text script over the editor window, and TwistedWave
will load the script, and match the text it contains with the speech
that was recognized in your recording.
Once the script was loaded, it will highlight in yellow the words that
have been recognized in the recording.
12.4.1 Synchronizing cursor and selection
Clicking one of the recognized yellow words in the text script will
automatically place the cursor in the audio recording at the
corresponding position. Likewise, placing the cursor in the audio
recording will scroll the script and select the corresponding word in
the text.
Similarly, selecting a region in either the text script or the audio
recording will select the corresponding region in the other window.
12.4.2 Detecting multiple takes
When recording a long text, it sometimes happen that a word is
misread, and you need to say the whole sentence again.
When that happens, you have to edit the audio file, and delete the incorrect
sentence. Manually placing a marker when you record and notice the
mistake will make it convenient to highlight the places that need editing.
Because TwistedWave knows the script you are reading, it can
automatically detect the instances where you go back and say a
sentence a second time. After you are done recording, it will
automatically place markers named "jump" to indicate the places
where you have jumped to another part of the script.
12.5 Speech recognition while recording
Instead of manually recognizing the speech after it has been recorded,
it is possible recognize in real time while the audio is being
recorded.
You can force TwistedWave to always recognize speech in the recorded
audio by enabling the option to Recognize Speech When
Recording, but if you already have a text script loaded, as
described above, TwistedWave will always recognize the speech in the
recorded audio.
The recognized speech will be matched with the script as you speak,
and the text will scroll automatically, allowing you to read long
texts without having to manually scroll it.
13 Metadata
Many audio file formats can store metadata in addition to the sound
data itself. Metadata can consist in several pieces of information you
would like to record with your document. In the case of a song for
instance, you may want to record the title of the song, the name of
the album and artist, and so on.
You can edit this metadata with the metadata edit panel, which can be
open from the menu File / Show Info…, or by clicking the
Info button from the toolbar.
TwistedWave can read and save music metadata from files in the aiff,
wav, mp3, mp4, flac and ogg/vobis format.
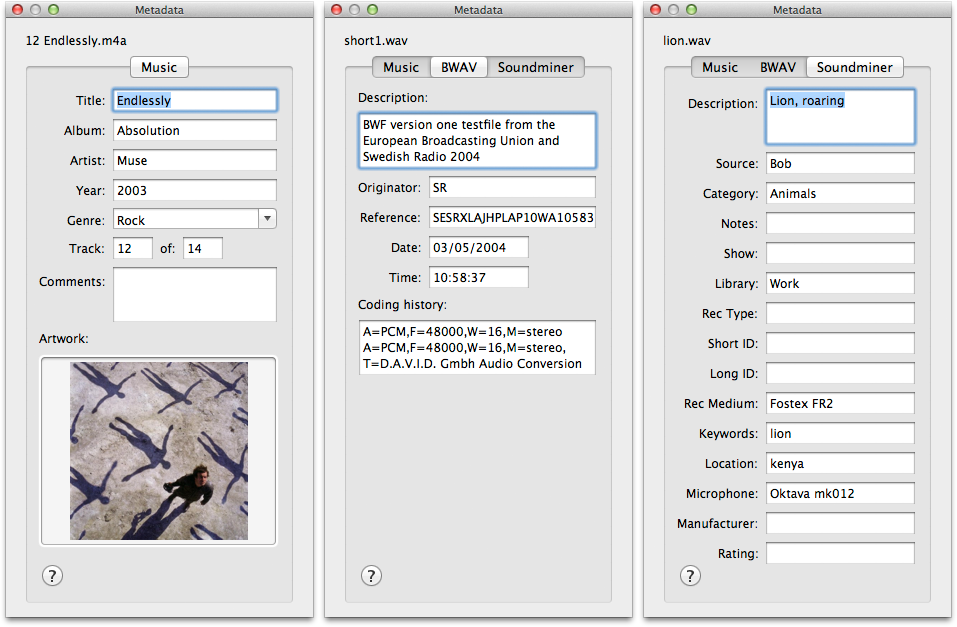
3 tabs of the metadata edit panel
13.1 BWAV and Soundminer
In addition to music metadata, the edit panel can show up to two
additional tabs for editing BWAV and Soundminer metadata. These
metadata are not specific to music, and can be used to store more
general information, such as a description of the sound, what kind of
microphone was used for the recording, where the sound was
recorded…
Note that BWAV metadata can only be saved in .wav files, and this tab
will only be present when editing a file in this format. Soundminer
metadata can be present in .wav and .aiff files.
13.2 FLAC metadata
Although FLAC does not have native support for BWAV and Soundminer
metadata, TwistedWave still allows you to edit and save FLAC files
with this kind of metadata.
Since version 1.2.1, the FLAC encoder has support for metadata found
in the WAV and AIFF files. When used with the option
--keep-foreign-metadata,
the encoder will keep the metadata from the original file in the FLAC
file. TwistedWave takes advantage of this possibility, and will save
the BWAV and Soundminer metadata chunks in the FLAC files. When the
FLAC files generated by TwistedWave are decoded with the command line
FLAC decoder, and if the --keep-foreign-metadata option is used, the
BWAV and Soundminer metadata chunks will be restored in the generated
WAV file.
14 Exporting the waveform
In addition to exporting a sound file in a different audio format,
TwistedWave offers the ability to export its waveform as a PNG image.
Exporting the waveform image with TwistedWave is not very different
than taking a screenshot. Where this can be very useful, however, is
when this is done in conjunction with the batch processing. This is a
very easy way to generate a small waveform image for many files in a
single step.
You can read more on batch processing in
section 16.
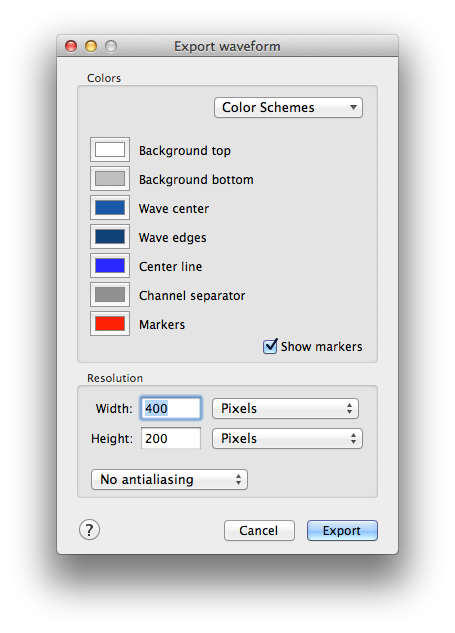
Exporting the waveform
The waveform export window allows you to customize the color scheme
for the exported waveform, or to select an existing one from the same
presets that are used to customize the appearance of the waveform in
the document windows.
The rendered waveform looks the same as it does in the regular editing
windows, unless you add some anti aliasing. The image here shows the
effect of the anti aliasing on the waveform rendering.
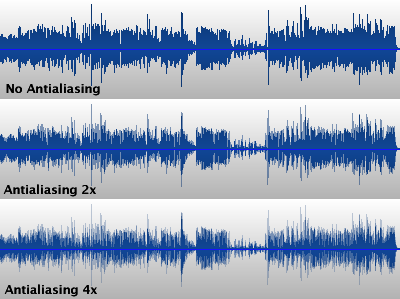
The effect of antialiasing on
the exported waveform
15 Video sync
Even though TwistedWave is an audio editor, it has always been able to
import the audio track from a movie, and edit it just as any regular
audio file.
With the "Video Sync" feature, support for video in TwistedWave is
going up a step, and it is now possible to do much more than just
loading an audio track, as described in the following subsections.
15.1 Save the audio track back to the original movie file
When you open a movie file in TwistedWave, it will show the audio
editor with the sound track from the movie. It will also open a second
window showing the video track.
The video will play when you play the audio, and will jump to the
corresponding frame when you place the cursor anywhere in the audio
waveform.
When you want to save your audio file, in addition to the usual audio
formats, you can select a movie format. When you save a movie,
TwistedWave will keep the original video, add the edited sound track,
and save it back to the original or to a new movie file.
If the option Video > Video Edits Follow Audio Edits is not
enabled (see next section), then the video is not re-encoded, and the
full image quality is preserved, allowing you to save the same video
multiple times without affecting the image quality. You should read
section 15.4 for more on audio and image
degradation when saving files.
15.2 Automatically edit a movie by matching the audio edits
If you select the option Video > Video Edits Follow Audio Edits
from the main menu, or by clicking the video edit icon in the toolbar
of the video window, then the video will not be saved untouched to the
destination file, but will instead follow all the edits that have been
done to the audio, such as:
- Cutting the audio will cut the corresponding video,
- Copy / pasting audio around will also copy the images,
- Reversing the audio will reverse the video,
- Time stretching the audio will slow down or accelerate the video.
You should keep in mind that because the video is being edited, it has
to be re-encoded by TwistedWave, and it may result in a degraded image
quality. Every time you close, reopen and edit the movie, such
degradation will occur. TwistedWave is smart, though, and is usually
able to re-encode only the parts where edits did occur, and re-use the
encoded images from the original file, as you can see in
section 15.4.
15.3 Create a movie by linking an audio file to an existing
video
There are cases where you have an existing audio file that you want to
use as the sound track for a movie, or you want to record in an empty
file, and have the recorded audio saved with a video. Select
Video > Link Video... from the main menu, and you will be able
to select the video file you want to use with your sound track. The
options to select the movie file formats in the file save dialog will
then be available.
15.4 Re-encoding and image degradation
When you open a compressed audio file, such as an mp3 file, edit it,
and then save it again, the audio has to be re-encoded and this can
result in some degradation of the original audio. For that reason, it
is advised to use a lossless file format when you need to re-open and
edit the same file multiple files.
Similarly, it is possible to store the audio track uncompressed in a
movie file. The MPEG4 file format doesn’t support this, but it is
possible to store the audio uncompressed in QuickTime (.mov) and
Matroska (.mkv) files. You should use one of these and select no audio
compression instead of AAC if you need to edit the same file multiple
times.
The same happens with videos, and re-encoding of video frames should
be avoided as much as possible. That being said, TwistedWave can avoid
re-encoding video frames in many cases, such as:
- When the video is not edited (the Video > Video Edits
Follow Audio Edits option is disabled, see
section 15.2), and the destination file format uses
the same video codec as in the original video, then TwistedWave can
save the video without re-encoding anything.
- When the video is edited and the destination file format uses
the same video codec as in the original video, then TwistedWave
needs to re-encode the video, but only the parts of the video that
are edited need to be re-encoded. If you do a single cut in a video
file, for instance, then only a small region around the cut has to
be re-encoded, depending on the position of key frames in the video
file.
- When the video is edited and the destination file format uses
the same video codec as in the original video, there are some cases
where TwistedWave is able to re-use all the original frames and not
re-encode anything, preserving the full image quality. This is
possible when all the images in the video track are key frames. This
can happen when the original video was encoded with a codec that
only uses key frames, such as "Motion JPEG", or with the h264
codec configured to use only key frames (some digital cameras
provide that option with the ALL-I or ALL-Intra setting).
16 Batch processing
TwistedWave’s batch processing abilities make it very easy to apply a
number of effects or other transformations to a large number of files.
The batch processing window, shown in the capture here, is composed of
two parts. The batch script is built in the upper half, and the set of
files on which to apply the script is selected in the lower half.
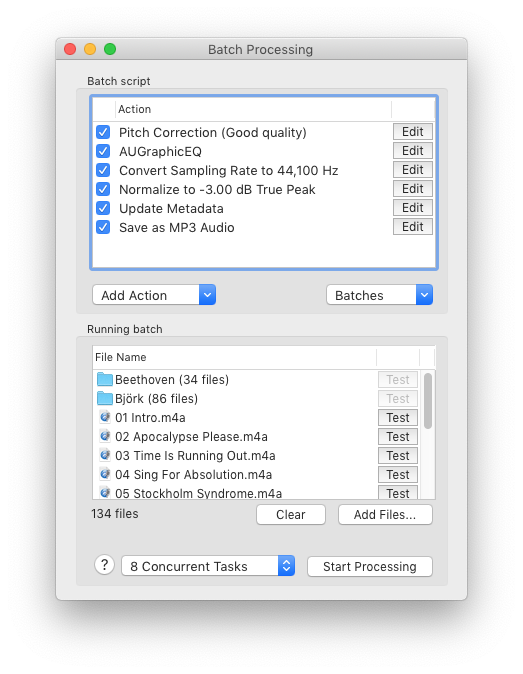
Batch processing window
16.1 Defining the batch script
The upper part of the batch processing window shows mainly a list of
all the actions that have to be performed on the selected files. When
the batch process is run, the actions are run one by one, from the top
of the list to the end on each of the selected files.
This list is initially empty, and a new action is added by selecting
it from the Add Action pop-up button in the lower left hand
corner. Most of them are the same effects that can be found in the
main menu when working on individual files.
In order for the batch script to do anything useful with the files, it
has to contain at least one of Save, Export Waveform Image,
or Analyze. You can even have more than one Save, if you
want to convert a bunch of files to different file formats at the same
time, for instance.
The behavior of most of the actions that can compose a batch script
can be further customized by clicking the Edit button sitting
next to their name. Than allows you to indicate the amount by which to
change the pitch or speed of a file, for instance.
In the lower right hand corner, another pop-up button allows you to
save batch scripts, or load a previously saved one.
16.2 Saving processed files
In order to save the files resulting from the batch process, you have
to add at least one Save action at the end of the process. As
shown in the capture, the Save action offers a number of
options to select the file format, destination and name.
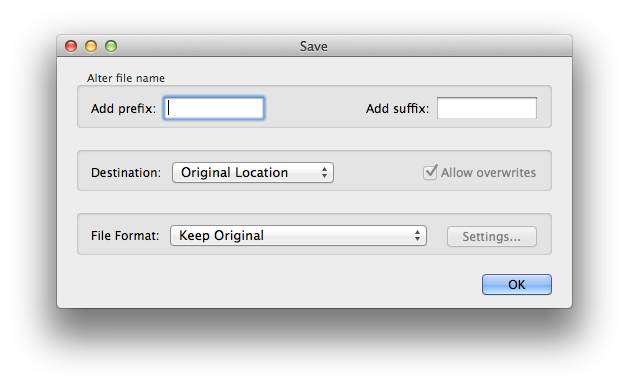
Saving options
It offers the possibility to add a prefix or a suffix in order to
alter the file name.
The location of the saved file, by default, is the same as the
original file. It is possible, however, to select another folder.
The format of the saved file can be either the original file format,
or another format which you can select from the file format pop-up
button.
Note that if you select both the original location and format, the
processed files will replace the original files, and such an action
should be performed only after the batch process was tested, and
verified to work as expected. If you select a different location or
file format, any already existing file will only be overwritten if the
Allow overwrites option was enabled.
16.3 Running the batch
When a batch process has been defined, you can add a few files to the
list by clicking the Add Files... button, or more simply by
drag and dropping them directly to the list.
You can add single files as well as folders to the list. When you add
a folder, all the sound files it contains are looked for, and the
number of file it contains is indicated in the list.
Also note that when a folder has been added to the list, when a
Save operation is being applied, if the destination is not the
original location, the original directory tree is reconstructed in the
destination folder, with the processed versions of the selected files.
You can then start the batch by clicking the Start Processing
button. If you want to test the batch, and run it on a single file
without saving anything, you can click the Test button in front
of a file name, and the processed file will open in an unsaved
TwistedWave document window.
16.4 Concurrent tasks
By default, TwistedWave will process the files one after the other.
For a long time, Mac computers have been equipped with more than one
CPU cores, and taking advantage of them to process the audio files in
parallel can significantly speed up the process.
Next to the Start Processing button, there is a pop-up button
that says N Concurrent Tasks. You can click it, and specify the
number of tasks you want to use. The number can go up to the number of
parallel threads that can run on your CPU.
Some tasks don’t require much CPU, and are rather limited by the speed
of your storage. If you want to convert many MP3 files to WAV, for
instance, using multiple concurrent tasks is not likely to speed up
the process a lot, because the CPU will be waiting for the disk to
finish writing the WAV file. This is especially true with slower hard
disk storage.
Another thing to take into account is that TwistedWave will use
temporary cache files when processing an audio file. If you process
many files in parallel, and these files are large, the cache files may
exceed your available storage, and TwistedWave will be unable to
complete the batch process.
16.5 Splitting files
The result of applying the batch script on a file will result in a
processed file which will usually be saved by one or more Save
operation at the end of the script.
Two batch processing actions (namely Split by Markers and
Split Channels) have the special ability to split an audio file
into several parts. When processing a file results in more than one
part, the Save operations will not save a single file, but the
different parts will be saved in different files.
17 TwistedWave iOS Remote
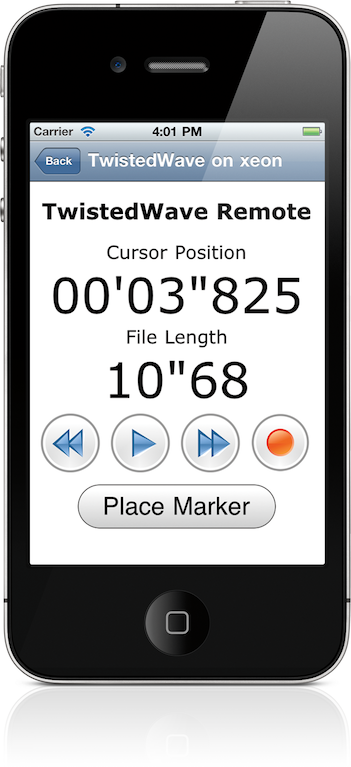
The TwistedWave Remote
The TwistedWave remote is an application for iPhone or iPod that can
be downloaded from the App Store. It will connect to a TwistedWave
application running on a mac, and allow you to remotely control it and
perform a few simple tasks, such as playing, recording or placing
markers.
18 Preferences
The Preferences window enables you to customize the behavior of
TwistedWave. The different options available are described in the
sections below.
18.1 General settings
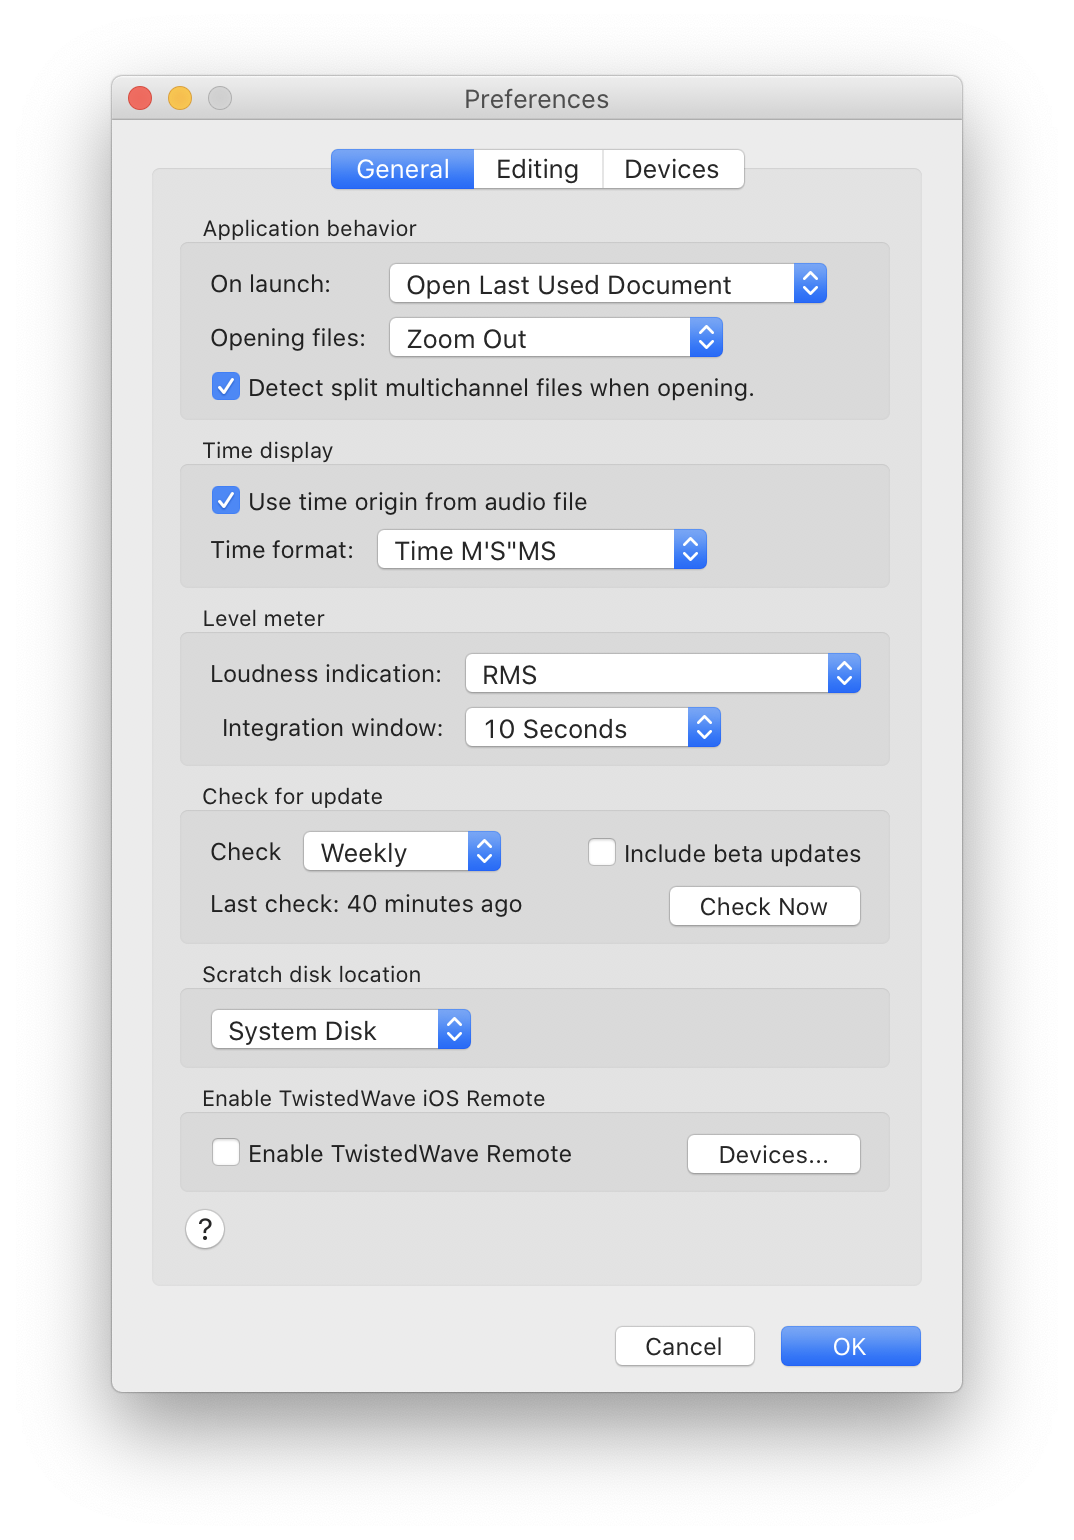
The Preferences Window (general settings)
18.1.1 Time display
- Some WAV or AIFF files can contain a time code information
specifying the time reference of the file. When this information is
available, TwistedWave uses it, and the timeline and cursor position
displays will use it as the time origin. Even if this information is
available, it may be desirable to work with times relative to the
beginning of the file, which can be done by unchecking the option
Use time origin from audio file.
- By default, the values displayed in the timelines and for the
cursor position in the toolbar are in minutes, seconds, and
fractions of a second. With the "Time format" option, you can also
select to see the time information in sample count, or display a
SMPTE time code value.
18.1.2 Level Meter
Two settings allow you to customize the loudness indication visible
below the level meter. By default, this value shows the RMS level in
decibels.
The value displayed corresponds to the energy integrated on a window
whose length can be specified with the "integration window"
setting. With the default of 10 seconds, the value displayed
represents the loudness of the 10 previous seconds of audio.
The "Loudness indication" setting allows you to select between the
RMS and LUFS measurement for the loudness indications.
When you select the LUFS, before integrating the energy contained in
the audio, a filter is applied to the sound in order to discard the
frequencies that are not perceived by the human ear, and don’t
contribute to the loudness.
18.1.3 Registration
When you register TwistedWave, either by entering a serial number, or
by purchasing directly from within the application, TwistedWave
becomes registered only for the user that is currently logged in on
your computer.
In the preferences window, an option allows you to make the
registration available to all the users.
18.1.4 Check for update
TwistedWave can automatically check for updates. It is recommended to
configure automatic updates, in order to get the latest bug fixes, and
keep TwistedWave compatible with the latest macOS
updates.
By checking the Include beta updates option, in addition to the
official updates, you will be offered beta updates that contain the
latest bug fixes and improvements.
If you are having an issue or have a suggestion regarding TwistedWave,
especially if you are using a beta version, you are encouraged to let
me know with the contact information available on
TwistedWave’s support page.
18.1.5 Scratch disk location
When you edit a file in TwistedWave, all the audio is stored,
uncompressed, in temporary files on your computer’s disk, and will
remain there until you close the editor window. If you work with very
large files, or need to open many files simultaneously, TwistedWave
may need to use a lot of temporary storage.
TwistedWave uses the system disk by default for the temporary storage.
If you need more space than is available on the system disk and you
have another volume connected to your computer, you can change the
scratch disk location to tell TwistedWave to use the disk you want.
18.1.6 TwistedWave iOS Remote
When you have enabled the TwistedWave Remote, you can connected to
your running TwistedWave instance with the iOS application, available
on the app store.
You can see how to use the remote in section 17.
18.2 Editing preferences
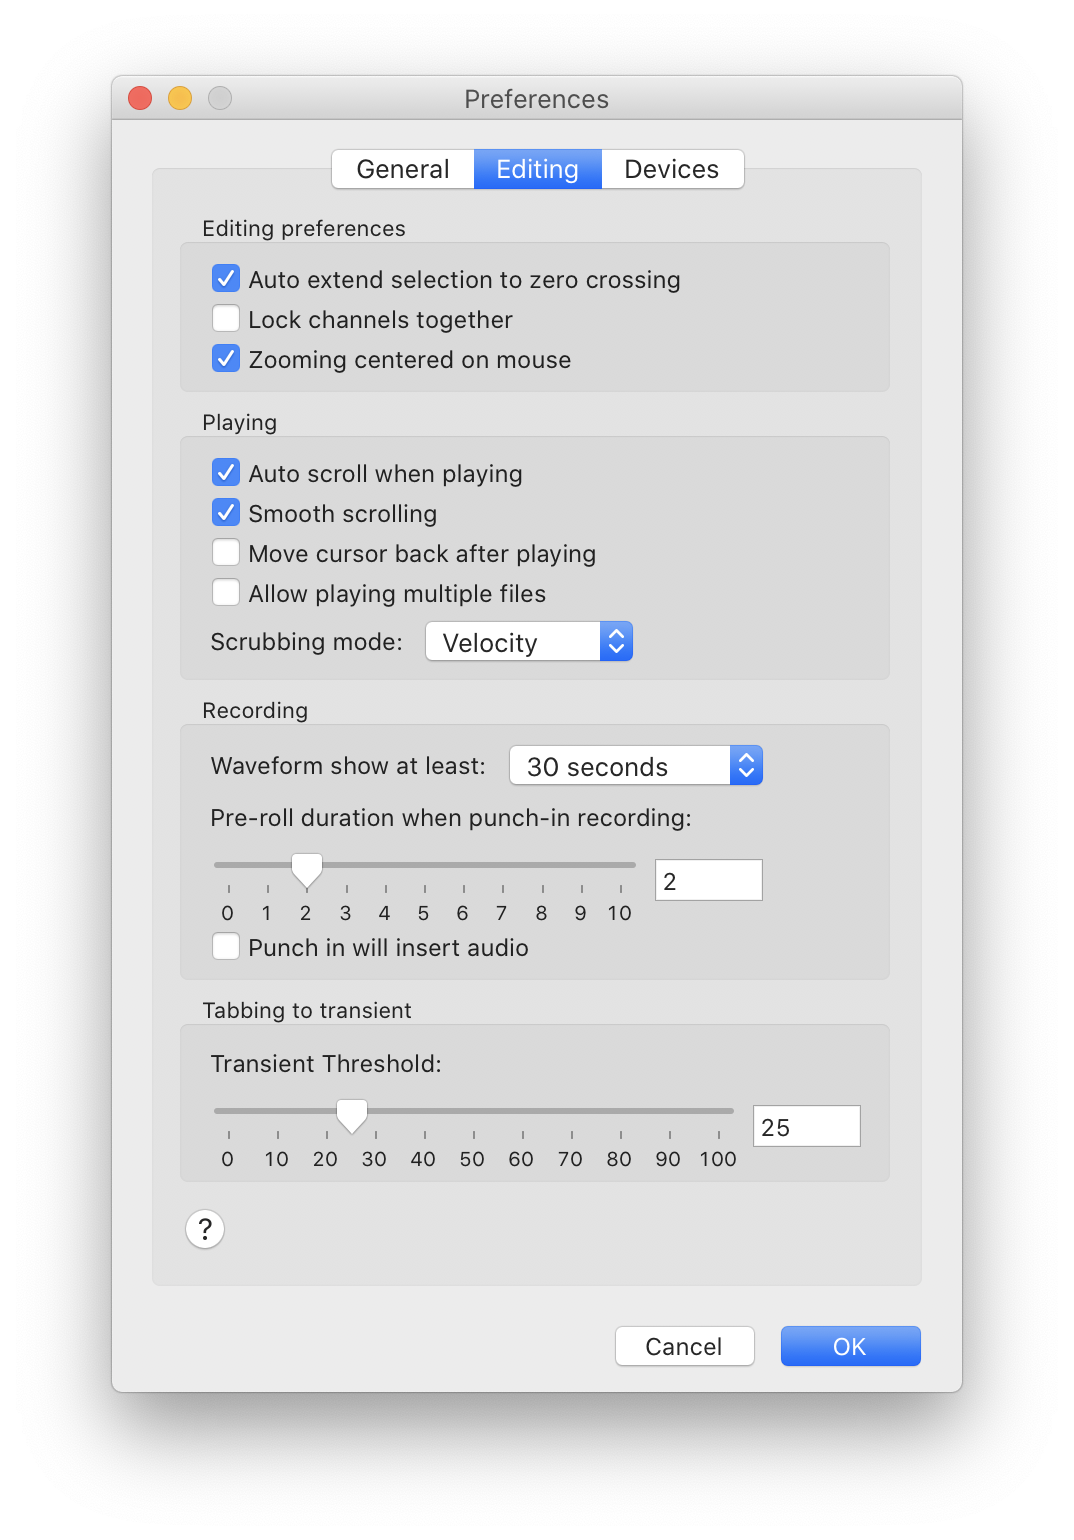
The Preferences Window (editing preferences)
18.2.1 Editing preferences
- The "Auto extend to crossing" option allows you to enable or
disable the ability of TwistedWave to automatically extend the
selection to the next zero crossing points in the sound. This
capability is described in more detail in
section 4.6.
- The "Lock channels together" option can be very useful when
working on multichannel files. When this option is checked,
selecting an area will always select all the channels at the same
time.
- By default, when zooming with the scroll wheel, TwistedWave
makes sure the insertion point remains in the center of the window
so that it is always visible. If you check the option "Zooming
centered on mouse", zooming in and out will be centered on the mouse
position instead. This allows you to control the point where you are
zooming in by moving the mouse while you are zooming. This can be an
efficient way to find a specific location in the waveform.
18.2.2 Playing
- The "Auto scroll when playing" option allows you to enable or
disable the automatic scrolling of the waveform when playing.
Disabling it can be useful when you are editing the selection, and
don’t want to loose the current position just to start the playback
in order to check what you have selected.
- When the option "Move cursor back after playing" is checked, the
cursor remembers its position, and comes back to its original place
after playing.
- The "Scrubbing mode" option allows you to select the behavior of
the playhead when dragging the mouse to perform scrubbing. The
different scrubbing options are described in
section 6.1.
18.2.3 Recording
Two options allow you to control the behavior of punch-in recordings.
(You can read more on punch-in recording in
section 10.1.)
The first option allows you to configure the duration of the pre-roll.
This is the number of seconds of audio that are played back before
TwistedWave starts recording.
The second option, disabled by default, tells TwistedWave that the
recorded audio should be inserted in the file instead of overwriting
what is already there.
Note that this option has no effect if the selection is active when
you start a punch-in recording. In that case, the recorded audio will
replace the selection, and the recorder will stop automatically when
it reaches the end of the selection.
18.2.4 Transient threshold
This slider allows you to adjust the threshold above which TwistedWave
can detect transients. The higher the value, the more pronounced the
transients have to be in order for TwistedWave to be able to detect
them. The value you use may depend on the kind of document you are
working on. If the transients are very marked, you can use a higher
value, in order to avoid detecting unwanted transients. Using the
transient detection in TwistedWave is described in more details in
section 4.8.
18.3 Audio devices
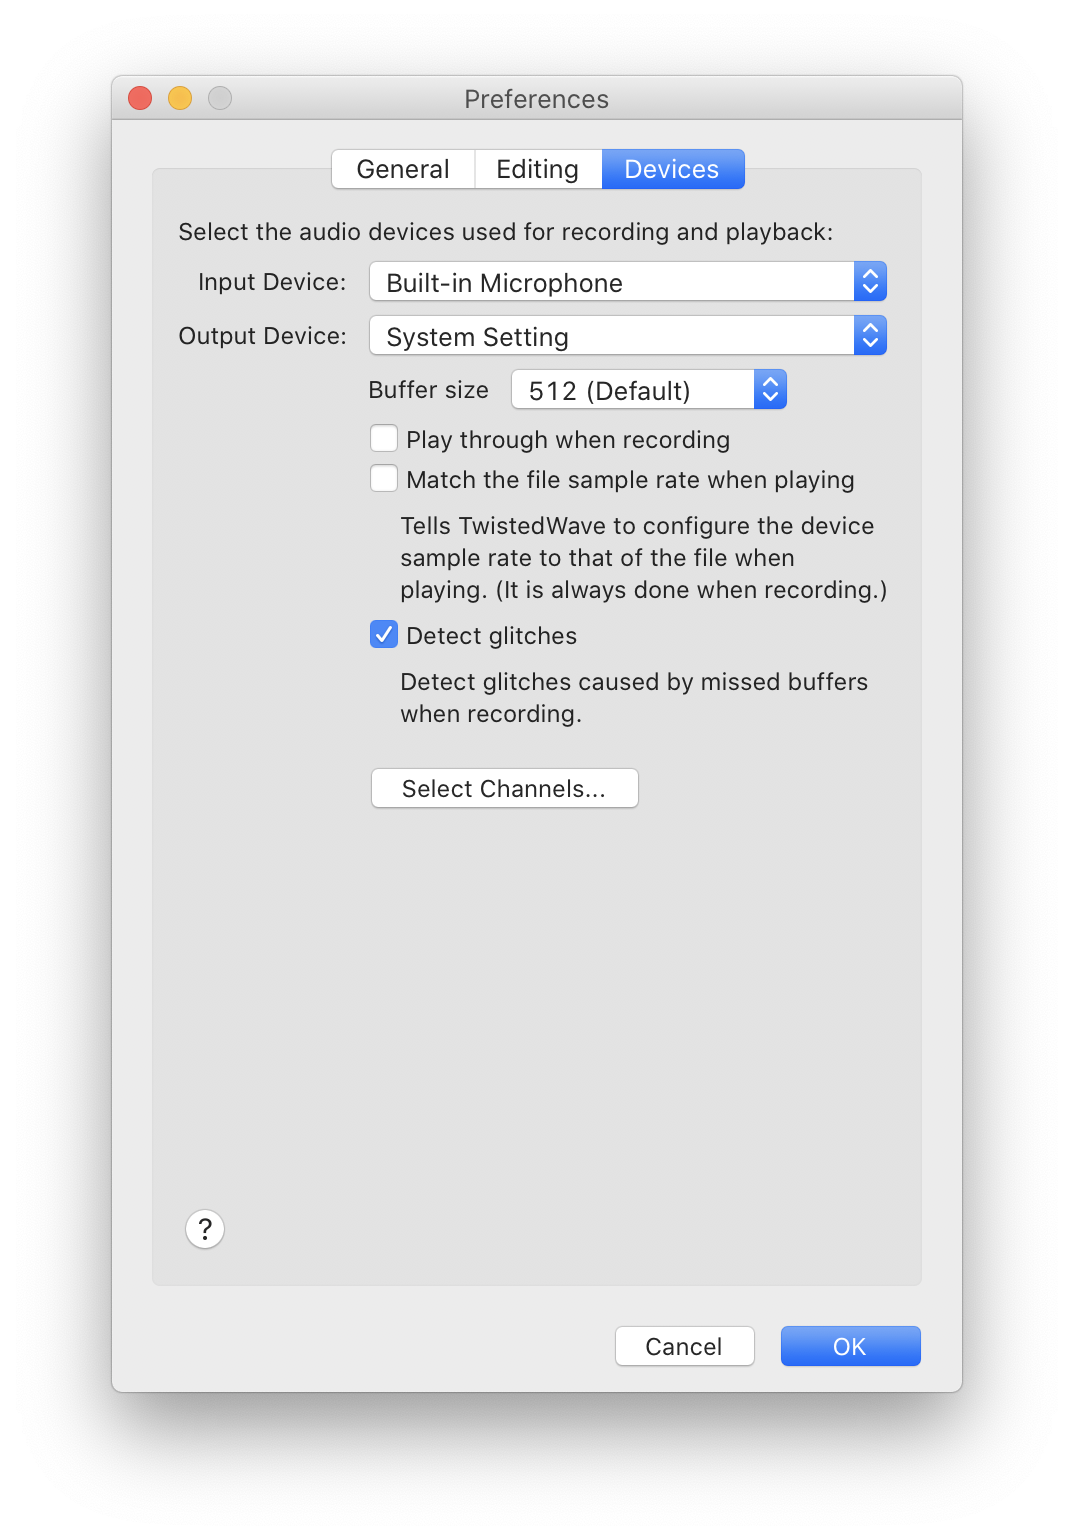
The Preferences Window (device settings)
18.3.1 Selecting audio devices
At the top of the devices tab of the preferences window, two pop-up
buttons allow you to select which input and output devices are used
for recording and playback.
If you select System Settings, TwistedWave will follow the
audio device used by the system for recording and audio playback.
If you select a specific device from the list, TwistedWave use that
one instead. If the device selected for recording is not available, if
it is not plugged-in or switched on for instance, TwistedWave will
warn you, and ask that you select another device. That will prevent
you from recording from an unwanted device, and notice after the fact
that you have been recording from your Mac’s built-in microphone
instead of your $1000 microphone.
18.3.2 Play through
When recording, you may want to monitor the sound being recorded. By
checking the option to Play through when recording, TwistedWave
will automatically play the audio fed to the input device when you
start recording.
18.3.3 Buffer size
A pop-up button enables you to adjust the buffer size. This
instructs TwistedWave about the size of the chunks of audio that
should be used when communicating with the sound card when playing or
recording. This setting is useful mainly when the Play through
option is used. When playing through, a small delay may be noticed
between the time the audio is recorded, and when it is played back on
the output device. By selecting a smaller buffer size, this delay can
be reduced.
18.3.4 Matching the sample rate
When you record audio with TwistedWave, it will automatically adjust
your audio interface’s sample rate to match that of the file you are
recording, in order to avoid sample rate conversions that could
slightly degrade the audio quality.
When playing audio back, the sample rate of the audio interface is not
adjusted by default. You may have another audio software using the
same audio interface, and fighting with TwistedWave to use another
sample rate. In order to avoid that kind of conflicts, you have to
manually check the Match the file sample rate when playing
checkbox.
18.3.5 Detect glitches
The Detect glitches option enables TwistedWave’s glitch
detection when recording. You can read more about glitch detection in
section 10.2.
18.3.6 Selecting channels
When TwistedWave records from a device that has more channels than the
file you are currently working on, it uses only as many channels as
necessary. If you have a 16 channel input device, and record a stereo
file, for instance, TwistedWave will record from the first two input
channels of your input device. However, you may not always want to use
the first two channels. In order to solve this, press the button
"Select Channels…", and TwistedWave will open a sheet allowing
you to specify the order in which the channels should be used for
recording.
This works exactly in the same way for playing, where you select the
channels to be used for the output.
18.4 Speech recognition
This tab allows you to configure the speech recognition integrated in
TwistedWave. You can read more about the speech recognition in
TwistedWave in section 12.
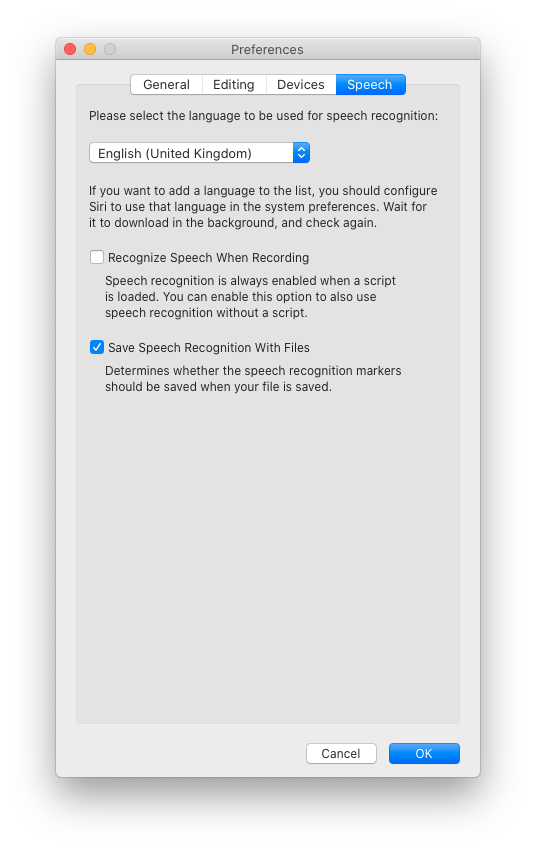
The Preferences Window (speech recognition
settings)
18.4.1 Language
Before the speech recognition can be used, it is necessary to select
the language of the spoken text.
There are not many languages available by default in the languages
menu. If the language you are using is not listed, and because the
speech recognition engine used by TwistedWave is the same as that used
by macOS’ dictation service, you can make a new language available by
selecting it as the language used for dictation. Open macOS’ Keyboard
preferences, and in the Dictation tab, you can configure a new
language. It may take a few minutes for the new language to be
downloaded in the background before it is available in TwistedWave.
You don’t have to restart TwistedWave in order to use the newly
available language. Closing and reopening the preferences window is
enough.
18.4.2 Speech recognition when recording
By enabling the option to Recognize Speech When Recording, it
is possible to have TwistedWave automatically recognize the speech
while you are recording, even if a text script was not loaded.
The speech recognition is always done if you are recording with a text
script loaded.
18.4.3 Saving speech markers
It is possible to disable the Save Speech Recognition With
Files option in order to save audio file without the speech
recognition markers. The speech recognition adds many markers in the
audio file, and it may be inconvenient when the file is opened in an
editor that doesn’t display the speech markers in a special way, like
TwistedWave does.
19 Keyboard shortcuts
Most of the keyboard shortcuts available in TwistedWave are attached
to menu items, and can be found by browsing the main menu.
Additionally, some shortcuts are not attached no any menu item, and
are described below.
19.1 Zooming
The + and - keys can be used to zoom the waveform in or out. The same
effect can be achieved with the up and down arrows.
The temporary zoom is activated with the Z and Shift-Z shortcuts. The
process is explained in detail in section 3.4.
19.2 Manipulating the selection
- Clicking and dragging the mouse over the waveform selects an
area of the file.
- Shift+clicking will edit the selection by dragging the edges of
the already existing selection.
- Option+clicking will add a region to the already existing
selection.
- Option+Shift+clicking will remove a region from the already
existing selection.
19.3 Moving the cursor
When a selection is present, the left and right arrows will move the
cursor to the edges of the selection.
When nothing is selected, the arrows will move the cursor to the
beginning or the end of the file.
19.4 Playing
Pressing the space bar will start playing the audio at the position of
the cursor. If a region of the file is selected, only that area is
played back.
Pressing space again will stop the playback.
20 Feeling at home
When you start working in a new environment, it takes some time
getting used to it before you are able to be fully efficient. With a
new application, this means getting to know how it works, what it can
do for you. If you were used to a similar application, the differences
between TwistedWave and what you were used to could complicate the
matter. In order to leverage your knowledge of other application, it
is possible to change the keyboard shortcuts to ones you are more
familiar with. It is also possible to change the colors of the
waveform, and make it suit your tastes better.
20.1 Changing colors
In order to change the color of the waveform, you have to open the
color editor, located in Edit / Edit Colors…. This will open a
window with a list of color swatches and short descriptions. You can
then click to edit the colors, and see how it affects the waveform in
real time.
There are two columns of color swatches in the editor. The first
column is used in light mode, and the second column defines the colors
used in dark mode. You can configure macOS to use
either the light or dark mode from the system preferences.
Here are a few things to note regarding the colors:
- When changing the wave color, you have the option to change both
the center and edge color. Having two different colors will fill the
wave with a gradient, making it look better.
- Similarly for the background color, you have to set the top and
bottom color in order to define a gradient.
- In order to change the color of the selection, you have to
specify the color of the selected wave, and the selected background.
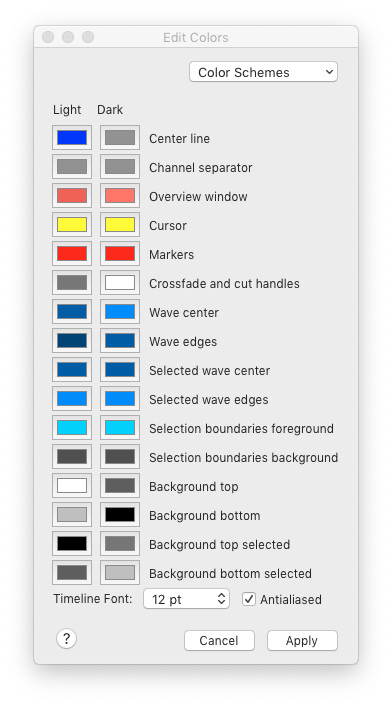
The Color Editor
The color editing window is also the place where you can change the
size of the font used in the timelines (the rulers above the main wave
and overview windows). You may also like not to have the font
antialiased, especially for small sizes.
Similarly to the Audio Unit presets, the Color
Schemes pop-up button at the top of the window allows you to save
and load color schemes. The color schemes are saved in individual
files, and the Manage Color Schemes… option opens a Finder
window showing the folder containing all the presets you could have
saved. You can remove these files, copy them on another computer or
exchange them with friends. These changes will automatically be
reflected in the pop-up menu.
20.2 Changing shortcuts
In order to change the shortcuts, select the menu Edit / Edit
Keyboard Shortcuts…. The main menu will enter in shortcut edit
mode, and a window will invite you to select an item from the menu in
order to change its associated keyboard shortcut.
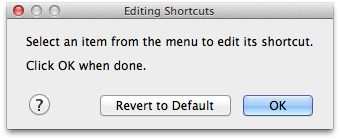
In shortcut edit mode
When you have selected a menu item, a second window shows you the
current and default associated shortcuts (if any), and waits for the
next key strokes to use as a new shortcut. You are also offered the
option to remove the current shortcut, or use the default.
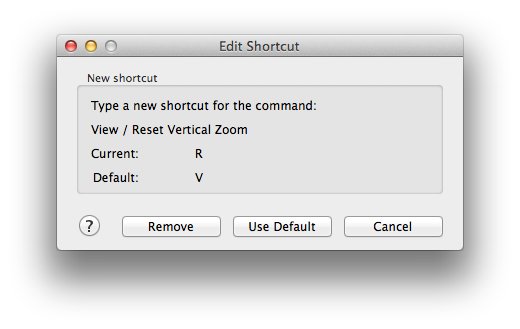
Editing a shortcut
21 Copyright notices
21.1 ZTX Time Scaling technology
ZTX Time Stretch/Pitch Shift technology licensed from Zynaptiq GmbH,
http://www.zynaptiq.com/ztx/, (c) Zynaptiq GmbH.
21.2 LAME
TwistedWave uses LAME for encoding mp3 files. LAME is licensed under
the LGPL (GNU Library General Public License). A copy of the LGPL can
be found at gnu.org.
The LAME source code can be obtained at
lame.sourceforge.net
21.3 TwoLame
TwistedWave uses TwoLame for encoding mp3 files. TwoLame is licensed
under the LGPL (GNU Library General Public License). A copy of the
LGPL can be found at gnu.org.
The TwoLame source code can be obtained at
www.twolame.org
21.4 FFMpeg
TwistedWave uses FFMpeg for decoding files in various formats. FFMpeg
is licensed under the LGPL (GNU Library General Public License). A
copy of the LGPL can be found at
gnu.org.
The FFMpeg source code can be obtained at
ffmpeg.mplayerhq.hu
21.5 libsox
libsox is licensed under the LGPL (GNU Library General Public License).
A copy of the LGPL can be found at
gnu.org.
The libsox source code can be obtained at
sourceforge.net
21.6 Guile
Guile is licensed under the LGPL (GNU Library General Public License).
A copy of the LGPL can be found at
gnu.org.
The Guile source code can be obtained at
gnu.org
21.7 id3lib
Id3lib is licensed under the LGPL (GNU Library General Public
License). A copy of the LGPL can be found at
gnu.org.
The id3lib source code can be obtained at
id3lib.sourceforge.net
21.8 libsndfile
Libsndfile is licensed under the LGPL (GNU Library General Public
License). A copy of the LGPL can be found at
gnu.org.
The libsndfile source code can be obtained at
www.mega-nerd.com
21.9 Ogg/Vorbis
TwistedWave uses libvorbis and libogg. They are used for reading and
writing Ogg/Vorbis files.
Copyright (c) 1994-2004 Xiph.org Foundation

Redistribution and use in source and binary forms, with or without
modification, are permitted provided that the following conditions
are met:

- Redistributions of source code must retain the above copyright
  notice, this list of conditions and the following disclaimer.

- Redistributions in binary form must reproduce the above copyright
  notice, this list of conditions and the following disclaimer in the
  documentation and/or other materials provided with the distribution.

- Neither the name of the Xiph.org Foundation nor the names of its
  contributors may be used to endorse or promote products derived from
  this software without specific prior written permission.

THIS SOFTWARE IS PROVIDED BY THE COPYRIGHT HOLDERS AND CONTRIBUTORS
"AS IS" AND ANY EXPRESS OR IMPLIED WARRANTIES, INCLUDING, BUT NOT
LIMITED TO, THE IMPLIED WARRANTIES OF MERCHANTABILITY AND FITNESS FOR
A PARTICULAR PURPOSE ARE DISCLAIMED.  IN NO EVENT SHALL THE REGENTS OR
CONTRIBUTORS BE LIABLE FOR ANY DIRECT, INDIRECT, INCIDENTAL, SPECIAL,
EXEMPLARY, OR CONSEQUENTIAL DAMAGES (INCLUDING, BUT NOT LIMITED TO,
PROCUREMENT OF SUBSTITUTE GOODS OR SERVICES; LOSS OF USE, DATA, OR
PROFITS; OR BUSINESS INTERRUPTION) HOWEVER CAUSED AND ON ANY THEORY OF
LIABILITY, WHETHER IN CONTRACT, STRICT LIABILITY, OR TORT (INCLUDING
NEGLIGENCE OR OTHERWISE) ARISING IN ANY WAY OUT OF THE USE OF THIS
SOFTWARE, EVEN IF ADVISED OF THE POSSIBILITY OF SUCH DAMAGE.
21.10 FLAC
TwistedWave uses libFLAC and libFLAC++. They are used for reading and
writing FLAC files.
Copyright (C) 2000,2001,2002,2003,2004  Josh Coalson

Redistribution and use in source and binary forms, with or without
modification, are permitted provided that the following conditions
are met:

- Redistributions of source code must retain the above copyright
  notice, this list of conditions and the following disclaimer.

- Redistributions in binary form must reproduce the above copyright
  notice, this list of conditions and the following disclaimer in the
  documentation and/or other materials provided with the distribution.

- Neither the name of the Xiph.org Foundation nor the names of its
  contributors may be used to endorse or promote products derived from
  this software without specific prior written permission.

THIS SOFTWARE IS PROVIDED BY THE COPYRIGHT HOLDERS AND CONTRIBUTORS
"AS IS" AND ANY EXPRESS OR IMPLIED WARRANTIES, INCLUDING, BUT NOT
LIMITED TO, THE IMPLIED WARRANTIES OF MERCHANTABILITY AND FITNESS FOR
A PARTICULAR PURPOSE ARE DISCLAIMED.  IN NO EVENT SHALL THE REGENTS OR
CONTRIBUTORS BE LIABLE FOR ANY DIRECT, INDIRECT, INCIDENTAL, SPECIAL,
EXEMPLARY, OR CONSEQUENTIAL DAMAGES (INCLUDING, BUT NOT LIMITED TO,
PROCUREMENT OF SUBSTITUTE GOODS OR SERVICES; LOSS OF USE, DATA, OR
PROFITS; OR BUSINESS INTERRUPTION) HOWEVER CAUSED AND ON ANY THEORY OF
LIABILITY, WHETHER IN CONTRACT, STRICT LIABILITY, OR TORT (INCLUDING
NEGLIGENCE OR OTHERWISE) ARISING IN ANY WAY OUT OF THE USE OF THIS
SOFTWARE, EVEN IF ADVISED OF THE POSSIBILITY OF SUCH DAMAGE.
21.11 WavPack
TwistedWave uses WavPack. It is used for reading and writing
WavPack files.
Copyright (c) 1998 - 2008 Conifer Software
All rights reserved.

Redistribution and use in source and binary forms, with or without
modification, are permitted provided that the following conditions
are met:

- Redistributions of source code must retain the above copyright
  notice, this list of conditions and the following disclaimer.

- Redistributions in binary form must reproduce the above copyright
  notice, this list of conditions and the following disclaimer in the
  documentation and/or other materials provided with the distribution.

- Neither the name of the Xiph.org Foundation nor the names of its
  contributors may be used to endorse or promote products derived from
  this software without specific prior written permission.

THIS SOFTWARE IS PROVIDED BY THE COPYRIGHT HOLDERS AND CONTRIBUTORS
"AS IS" AND ANY EXPRESS OR IMPLIED WARRANTIES, INCLUDING, BUT NOT
LIMITED TO, THE IMPLIED WARRANTIES OF MERCHANTABILITY AND FITNESS FOR
A PARTICULAR PURPOSE ARE DISCLAIMED.  IN NO EVENT SHALL THE REGENTS OR
CONTRIBUTORS BE LIABLE FOR ANY DIRECT, INDIRECT, INCIDENTAL, SPECIAL,
EXEMPLARY, OR CONSEQUENTIAL DAMAGES (INCLUDING, BUT NOT LIMITED TO,
PROCUREMENT OF SUBSTITUTE GOODS OR SERVICES; LOSS OF USE, DATA, OR
PROFITS; OR BUSINESS INTERRUPTION) HOWEVER CAUSED AND ON ANY THEORY OF
LIABILITY, WHETHER IN CONTRACT, STRICT LIABILITY, OR TORT (INCLUDING
NEGLIGENCE OR OTHERWISE) ARISING IN ANY WAY OUT OF THE USE OF THIS
SOFTWARE, EVEN IF ADVISED OF THE POSSIBILITY OF SUCH DAMAGE.